Removing Record Contact Relationships

Background

Whilst helping a customer upgrade to the latest version of Content Manager, I saw something that I've been seeing more often.  They had numerous unknown locations associated as contacts to their email records.  That is common enough, but these were improperly parsed SMTP addresses.  

The administrator of that dataset was manually removing these locations from the dataset as they have no value.  However, Content Manager does not allow you to remove a location if there are contact relationships in existence.  The screen-shot below demonstrates the error message you'd receive if you tried to manually remove the location.

Error Message

Error Message

To work around this the administrator was selecting a location to use as a replacement.  The end result is a location in Content Manager which is a contact on thousands upon thousands of records.  It doesn't make much sense to me.

Solution

One possible solution is to create a new add-in which would allow the administrator to remove the contact relationships before deleting the location.  Other possible solutions include: location add-in to automatically removing all contact relationships pre-delete, record add-in to automatically remove all contact relationships post-save, event processor add-in to automatically remove the contact relationships post record registration, and a stand-alone console app to show/correct all locations with this issue.  To me it makes the most sense to create a location add-in which allows the administrator to manually remove these contact relationships.  If the solution works well, then crafting something to do it in an automated fashion would make sense as the next step. 

You can download the add-in here.

Solution in Action

When the administrator right-clicks on a location they'll see this:

When the administrator clicks the "Remove Contact Relationships" they'll either be prompted to confirm the removal of the record contact relationships, like so:

Confirm Removal

Confirm Removal

Or the administrator will be told there are no relationships to remove:

No contact relationships Dialog

No contact relationships Dialog

After the removal has completed the results are shown to the administrator:

Removal Results Dialog

Removal Results Dialog

The add-in also works if you tag multiple locations and then invoke the add-in:

Multiple locations tagged

Multiple locations tagged

The behavior is slightly different when working with tagged locations.  You won't be prompted to confirm the removal.  The record contact relationships will be removed and then a results dialog will indicate the total number removed, as shown below.

Results when removing from tagged locations

Results when removing from tagged locations

Installing the Add-in

Launch the installer and then click next on the welcome dialog:

Welcome dialog

Welcome dialog

Alternate the installation path, if necessary, to reflect the actual folder of your HPE Content Manager x64 installation.  The installer does not intelligently detect the actual install folder.  Click Next after confirming installation path.

Installation Path

Installation Path

Click Install when presented with the confirmation dialog:

Confirmation Dialog

Confirmation Dialog

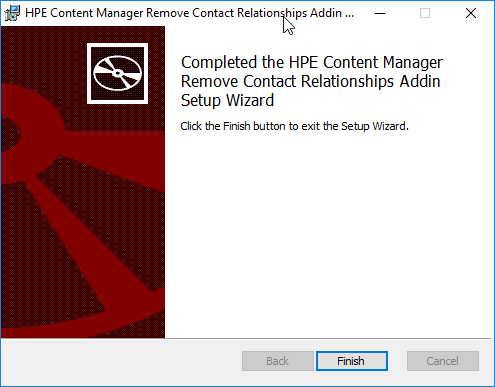
Depending on your workstation configuration, you may be prompted by Windows to authorize the installation.  Click yes if prompted.  Once the installation is completed you'll be shown the completion dialog.  Click Finish on that to close the installer. 

Completion Dialog

Completion Dialog

If you open windows Explorer you should see one new file in the installation folder:

Windows Explorer View

Windows Explorer View

Configuring the add-in

Open HPE Content Manager and then click External Links from the Administration ribbon:

HPE Content Manager Administration Ribbon

HPE Content Manager Administration Ribbon

Click New Generic Add-in (.Net):

External Link Dialog

External Link Dialog

Update the new generic add-in dialog as shown in the image below and then click Ok

Add-in Properties

Add-in Properties

If the Add-in is installed correctly then the dialog will close and you'll see the add-in listed in the listbox on the external links dialog, as shown below.

Click Properties and then click the Used By tab:

Check both the unknown and person location types and then click Ok.

Used By tab of the external link

Used By tab of the external link

Building a CM SQL Facade

I'm in the middle of an upgrade for a customer for whom I need to recompile an SQL project I previously created.  At the same time, another customer needed this exact same type of solution.  In both cases they had separate systems which needed to query TRIM/Content Manager via SQL statement.  This is not provided out-of-the-box.

Although you can query Content Manger directly via SQL, you most definitely should not.  To maintain certification and remain secure, all access to Content Manager should go through the provided SDKs. Therefore, we need scaffold up an interface ontop of the SDK which SQL can leverage.

Programmers call this a facade.


Setting the goal

I'd like to be able to do two things:

  1. Execute a stored procedure which gives me a list of customers
  2. Execute a stored procedure which gives me a list of documents for a given customer

To achieve this goal I need to have a record type defined for my documents and a property on them called customers.  To keep things simple for the blog posting I'll simply fetch all locations and present those as my customers.  Then I'll return all documents that location has authored.  

For this blog posting I'm only going to show the list of customers.  The logic for documents is something you can test on your end.

Defining the procedures

Based on my goals I'll need to create two procedures: GetCustomers, GetCustomerDocuments. Let's retrieve each customer's URI and name.  For the documents, let's retrieve the number, title, and web URL for each record of type document where the record's author matches a given location's uri.  

I'll need method signatures which look like this:

[Microsoft.SqlServer.Server.SqlProcedure]
public static void GetCustomers()
{
 
}
 
[Microsoft.SqlServer.Server.SqlProcedure]
public static void GetCustomerDocuments(long customerUri)
{
}

Coding the procedures

We can output directly to the sql server pipe and send meta-data for each object in Content Manager.  To get an object we'll need to execute a search.  That requires a connection to the dataset though, so the TRIMSDK must be loaded into the solution (and SQL server).  I've chosen the COM SDK because I'm more familiar with it.  The .Net SDK, ServiceAPI, or webservice could also be used.

Note: I'm providing the skeleton implementation, which is no where near production ready.  Use at your own risk.

[Microsoft.SqlServer.Server.SqlProcedure]
  public static void GetCustomers()
  {
      Database trimDatabase = null;
      Locations customerLocations = null;
      try
      {
          RemoveLogFile();
 
          Log("Creating Database Object");
          trimDatabase = new TRIMSDK.Database();
          trimDatabase.Id = "CM";
          trimDatabase.WorkgroupServerName = "APPS";
          Log("Connecting");
          trimDatabase.Connect();
          Log("Making Locations");
          customerLocations= trimDatabase.MakeLocations();
          customerLocations.SearchString = "all";
          Location customerLocation = null;
          if (customerLocations.Count > 0)
          {
              SqlMetaData[] md = new SqlMetaData[2];
              md[0= new SqlMetaData("uri"SqlDbType.BigInt);
              md[1= new SqlMetaData("customerName"SqlDbType.NVarChar, 50);
              SqlDataRecord row = new SqlDataRecord(md);
              SqlContext.Pipe.SendResultsStart(row);
              while ((customerLocation = customerLocations.Next()) != null) {
                  Log($"Location Found: {customerLocation.FullFormattedName}");
                  row.SetInt64(0, (long)customerLocation.Uri);
                  row.SetSqlString(1, customerLocation.FullFormattedName);
                  SqlContext.Pipe.SendResultsRow(row);
                  ReleaseObject(customerLocation);
                  customerLocation = null;
              }
              SqlContext.Pipe.SendResultsEnd();
              Log("Done");
          } else
          {
              Log("No Locations Found");
          }
 
      }
      catch ( Exception ex )
      {
          Log("Error: " + ex.Message);
          Log(ex.ToString());
      }
      finally
      {
          ReleaseObject(customerLocations);
          customerLocations = null;
          ReleaseObject(trimDatabase);
          trimDatabase = null;
      }
  }


Installing the assemblies

After compiling the solution you have to load the assembly and COM SDK Interop into the SQL Server database, like shown below:

Add the assemblies with unrestricted access and dbo as owner.  

Creating the SQL procedure

After the assemblies have been loaded you can create the SQL CLR procedure by executing the statement below:

CREATE PROCEDURE [dbo].[GetCustomers]
WITH EXECUTE AS CALLER
AS
EXTERNAL NAME [CMFacade].[StoredProcedures].[GetCustomers]
GO

Executing the SQL procedure

With everything installed and wired-up, we can execute the procedure by using this statement:

USE [CMFacade]
GO
DECLARE	@return_value int
EXEC	@return_value = [dbo].[GetCustomers]
SELECT	'Return Value' = @return_value
GO

Example results:

Retrieving Customer Documents

Now that there's a procedure for getting all of the customers, I applied the same approach and created a procedure returning the documents.  As shown in the screen shot below I'm only returning the fields needed.  This is exactly why a facade is important: it exposes only what is needed.

DataPort's Text File Import Byte Order Mark Requirement

Ever since DataPort was released I've heard people grumble about the requirement that text files include a Byte Order Mark.  Eventually, I too found it annoying.  Might as well create a new data port import formatter that solves the problem.

The easiest solution is to add a Byte Order Mark when there isn't one.  That takes 4-5 lines of code, so rather simple.  Once that's been done Data Port needs to be updated to reflect the new option and we're all set.

Feel free to use my copy.  Or follow the instructions to recreate this yourself.


Here's how I accomplished this....

First I decompiled the out-of-the-box Data Port Import Formatter (ImportDataFormatterTab) using IL Spy, copying the contents to my clipboard:

Next I launched Visual Studio and created a new class library project named "ImportDataFormatterTabAutoBOM":

I removed the default class Visual Studio gave me:

I added a new class named "ImportDataFormatterTabAutoBOM":

I replaced the content of the new class file with the content from IL Spy and immediately add "AutoBOM" to the class name:

I removed unnecessary references and imported those required:

Two errors have to be fixed before continuing:

Replace the assert with code which shows the assert message via the windows forms message box:

if (this.m_reader == null)
{
    System.Windows.Forms.MessageBox.Show("m_reader == null. StartImport must be called prior to calling GetNextItem");
    return null;
}

Replace the Browse method as follows:

public string Browse(Form parentForm, string searchPrefix, Point bottomRight, Dictionary<AdditionalDataKeysDescriptiveData> additionalData)
{
    string fileName = searchPrefix;
    using ( OpenFileDialog ofd = new OpenFileDialog() )
    {
        if ( ofd.ShowDialog() == DialogResult.OK )
        {
            this.VerifyBOM(fileName = ofd.FileName);
        }
    }
    return fileName;
    //string text = Helper.BrowseForFileOpen(parentForm, searchPrefix, "Text Files|*.txt|All Files|*.*");
    //this.VerifyBOM(text);
    //return text;
}

Add code to the VerifyBOM method that adds a BOM if it's not detected in the file:

private void VerifyBOM(string fileName)
       {
           if (!string.IsNullOrWhiteSpace(fileName))
           {

                if (this.m_fileHasBom.HasValue && (string.IsNullOrWhiteSpace(this.m_fileName) || this.m_fileName == fileName))
               {
                   this.m_fileHasBom = new bool?(this.m_fileHasBom.Value);
               }
               else
               {
                   if (!HP.HPTRIM.Framework.IO.IOHelper.FileHasBOM(fileName))
                   { // no byte order mark.... let's fix that and try again
                       String fileContent = System.IO.File.ReadAllText(fileName);
                       using (TextWriter writer = File.CreateText(fileName))
                       {
                           writer.Write("\xfeff");
                           writer.Write(fileContent);
                           writer.Close();
                       }
                   }
                   this.m_fileHasBom = new bool?(HP.HPTRIM.Framework.IO.IOHelper.FileHasBOM(fileName));
               }
               if (!this.m_fileHasBom.Value)
               {
                   throw new Exception(TrimApplicationBase.GetMessage(MessageIds.dp_err_noBOM, fileName));
               }
           }
       }

Compile the solution, open windows explorer to the debug output folder, and copy the output file to the clipboard:

Past the compiled class library into the Content Manager installation directory:

Navigate to the AppData directory for Data Port preferences:

Edit the Import Data Formatters configuration file and duplicate the existing Import Formatter section:

  <DataFormatterDefinition>
    <DisplayName>Tab Delimited</DisplayName>
    <AssemblyName>HP.HPTRIM.DataPort.Common.dll</AssemblyName>
    <ClassName>HP.HPTRIM.DataPort.Framework.DataFormatters.ImportDataFormatterTab</ClassName>
  </DataFormatterDefinition>

Tweak the values to reflect what was just built in the class library:

<ArrayOfDataFormatterDefinition xmlns:xsd="http://www.w3.org/2001/XMLSchema" xmlns:xsi="http://www.w3.org/2001/XMLSchema-instance">
  <DataFormatterDefinition>
    <DisplayName>Tab Delimited</DisplayName>
    <AssemblyName>HP.HPTRIM.DataPort.Common.dll</AssemblyName>
    <ClassName>HP.HPTRIM.DataPort.Framework.DataFormatters.ImportDataFormatterTab</ClassName>
  </DataFormatterDefinition>
  <DataFormatterDefinition>
    <DisplayName>Tab Delimited (Auto BOM)</DisplayName>
    <AssemblyName>ImportDataFormatterTabAutoBOM.dll</AssemblyName>
    <ClassName>HP.HPTRIM.DataPort.Framework.DataFormatters.ImportDataFormatterTabAutoBOM</ClassName>
  </DataFormatterDefinition>
</ArrayOfDataFormatterDefinition>

Launch DataPort and use the new formatter: