IDOL Firewall Rules

The HPE technical support folks released a new support tip regarding firewall rules for IDOL.  I like the way they've written it up and how they've explained it.  Though what they left out was how to go about actually implementing the firewall rules.  

I took the information they provided and placed it within a powershell script.  Obviously others may need to tweak it to suit their environment, but it should help most sites accomplish the task without much effort.  Just run the script via an elevated powershell command prompt (or remotely via CIM).


$rule = Get-NetFirewallRule -Name "HPE_CM_IDOL_SERVER"
if ( $rule -eq $null ) 
{
    New-NetFirewallRule -Name HPE_CM_IDOL_SERVER -DisplayName "HPE Content Manager IDOL Server" -Description "Enables ports 9000-9002,9070" -Protocol TCP -LocalPort 9000-9002,9070 -RemotePort 9000-9002,9070
    Write-Host "IDOL Server rule created"
} else {
    Write-Host "IDOL Server rule already exists"
}
 
$rule = Get-NetFirewallRule -Name "HPE_CM_IDOL_CONTENT1"
if ( $rule -eq $null ) 
{
    New-NetFirewallRule -Name HPE_CM_IDOL_CONTENT1 -DisplayName "HPE Content Manager IDOL Content 1" -Description "Enables ports 9100-9102" -Protocol TCP -LocalPort 9100-9102 -RemotePort 9100-9102
    Write-Host "IDOL Content 1 rule created"
} else {
    Write-Host "IDOL Content 1 rule already exists"
}

TIL: Windows Server 2016 Core

I have not yet seen a CM implementation hosted on a Windows 2016 server, let alone one on server core.  Eventually that will change.  So time to play and see what happens.

As shown in the picture below, server core does not have a desktop.  Also missing are: Taskbar, Windows File Explorer, Control Panel, and the Event Viewer.  It does have a command prompt though.

UI experience in 2016 server core

UI experience in 2016 server core

This should be a clear sign to application administrators that the product administration tasks would not be performed from the server (or at least, that doesn't really fit with the intended use of server core). 

On my test VM I cannot even launch the thick client.  Same for the Enterprise Studio.  Neither presents me with any sort of error message, they just don't launch.  

To effectively use Server Core with Content Manager, I should start doing things remotely. First I need to enable some firewall rules via a powershell session.  These may or may not be needed in your environment.

set-netfirewallrule -name remoteeventlogsvc-in-tcp -Enabled True
set-netfirewallrule -name remoteeventlogsvc-np-in-tcp -Enabled True
set-netfirewallrule -name remoteeventlogsvc-rpcss-in-tcp -Enabled True

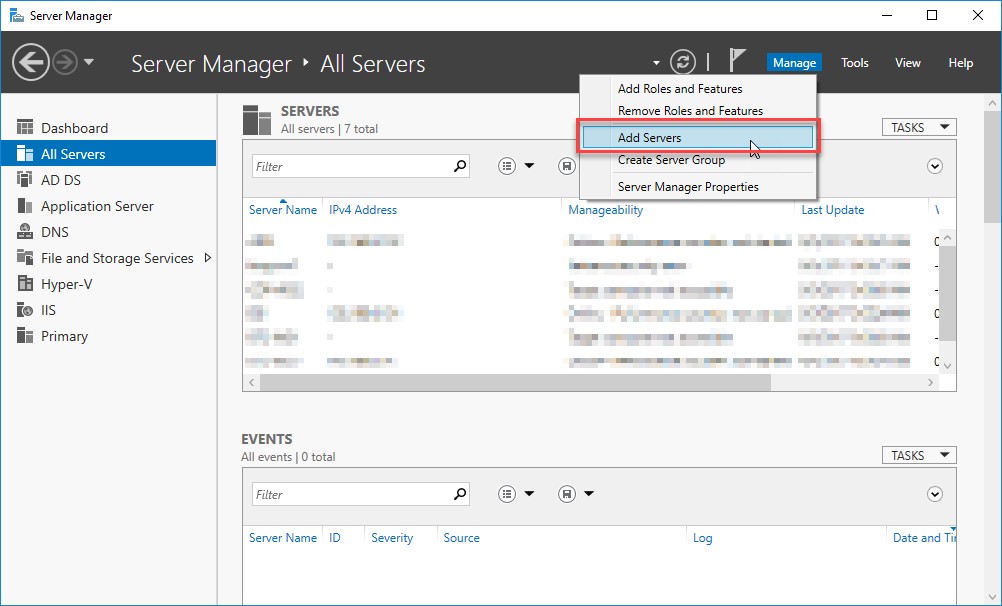
Now, from my Windows 10 Workstation, I open the Server Manager and add my server.  

Add Servers Option in Server Manager

Add Servers Option in Server Manager

Next I'll remote onto the server (I used HyperV to connect directly to the server core console, but you'd probably use RDP or a remote PSSession)  and enable the administration of this server by the domain account used to run the CM workgroup service.  I ran "sconfig" and then used option 3 to add in the account.  

2017-09-05_11-42-43.png

Next I install CM using the standard installer.  It would be best to use command-line parameters, but you will see the installer UI on the server if you run it manually.

Running the installer on 2016 server core

Running the installer on 2016 server core

Once installed, it must be configured.  I'm skipping the required steps for local security policy settings, folder structure preparation, and CM firewall rules (do these on your own).  Keep in mind that you should really be doing all of this remotely, via a remote powershell session.  RDP access to the server is truly not needed for any of these tasks.

Configuring the application is as easy as choosing "Open" from a local instance of the Enterprise Studio.  That means installing the studio (and probably the workgroup server itself) on your local machine.  Once launched, you can click the File ribbon, select open, navigate to the server's configuration file, and selecting it.  The Enterprise Studio tells you, in the window's title bar, the current location of the configuration file.

Appearance of Enterprise Studio when remotely managing the instance

Appearance of Enterprise Studio when remotely managing the instance

So now I've got a fully functioning instance of CM on Windows Server Core 2016!   In later posts I'll show how to leverage the Windows Server Manager to monitor the health of the CM instance.  For now, I can increase the total number of servers I have because each will require fewer resources (one of the biggest benefits of the usage of a core server).

Scripting the workstation upgrade

I've been upgrading environments for years via batch files.  I think it's time I ported one of these into a Powershell script.  Batch files just seem so antiquated.

My batch script is broken down as follows:

  1. Script, Log File, and Machine Preparation
  2. Uninstall old products
  3. Install new product
  4. Clean the workstation and user profiles
  5. Apply any tweaks

Script, Log File, and Machine Preparation

First I need to identify where the logging information from the upgrade should be placed.  In this example I'll place it into the temporary path as defined in the environment variables.  This might not work for me if deploying administratively (retrieving those files requires you know which account executed the script), but it works for my example.

$logDir = Join-Path $env:TEMP "TRIM_Upgrade"
$logFile = Join-Path $logDir "$((get-date).ToString('yyyyMMdd')).log"
if ( (Test-Path $logFile) -eq $false ) 
{
    New-Item -ItemType File -Force -Path $logFile
    Write-Host "Created Log File: $($logFile)"
} else {
    Write-Host "Log File Already Existed: $($logFile)"
}

Uninstall old products

Most products can be uninstalled by executing "msiexec /X{<GUID>}", where <GUID> is the GUID of the application.  These are super easy to find in the registry when inspecting the environment to be upgraded. With those in hand I can sequence their removal by manually invoking the command whilst supplying the GUID.  Obviously an important thing to consider is how to react when one of the products is missing (is that an upgrade failure?), but one easy way to accomplish this is shown below.

$uninstalls = @( 'D8B2D69F-7FA0-4BC8-8E31-C675162229D1', 'B480C3B2-9432-41B9-BD4A-421A4A6AB4C6', '112268A9-B0FB-421C-BEDB-A08B32E84207' )
foreach ( $uninstall in $uninstalls ) 
{
    if ( (Start-Process -FilePath "msiexec.exe" -ArgumentList "/X{$($uninstall)} /passive /norestart" -Wait -Passthru).ExitCode -eq 0 ) {
        Write-Host "Uninstalled: $($uninstall)"
    } else {
        Write-Host "Not Uninstalled: $($uninstall)"
    }
}

Install new Product

To install the new version we need to execute the same command, but with different parameters.  One parameter will be the source installer, another will be where to log MSIEXEC output, and the rest will provide values to necessary fields used by the installer.

$msiFile =  'HPE_CM_x86.msi'
$installerLog = Join-Path $logDir ($msiFile+'.log')
$args =  """$($msiFile)"" /qb /norestart /l*vx ""$($installerLog)"" INSTALLDIR=""C:\Program Files\Hewlett Packard Enterprise\Content Manager\"" ADDLOCAL=HPTRIM,Client HPTRIMDIR=""C:\HPE Content Manager"" DEFAULTDBNAME=""CM"" DEFAULTDB=""CM"" STARTMENU_NAME=""HPE Content Manager"" TRIM_DSK=""1"" TRIMREF=""TRIM"" PRIMARYURL=""WG1:1137"" SECONDARYURL=""TRIMWG2:1137"" AUTOGG=""1"" WORD_ON=""0"" EXCEL_ON=""0"" POWERPOINT_ON=""0"" PROJECT_ON=""0"" OUTLOOK_ON=""1"" AUTHMECH=""0"""
if ( (Start-Process -FilePath 'msiexec.exe' -ArgumentList $args -Wait -Passthru).ExitCode -eq 0 ) {
    Write-Host "Installed: $($msiFile)"
} else {
    Write-Host "Installation Failed: $($msiFile)"
}

Don't forget that HPE now released Content Manager patches using the MSP approach, so after executing this you'd also the apply the patches in the same manner.  Same thing goes for any add-ons. 

Since this is now in Powershell, I could actually implement a commandlet with commandbinding such that I remotely perform the installation.  Implementing the script that way means you don't even really need to execute it via some central administrative location.  Anyone with access to powershell, with permission to install software, and with remote pssession access to the target machine can perform an upgrade via the script.  That is something batch files could never do.

Cleaning up the Workstation

The installation process leaves all kinds of things on the machine.  Some are okay and some are not.  Ultimately the cleanup and tweaking tasks are geared towards ensuring the end-user's experience is desirable (or at least acceptable).  

A prime example is the dreaded lingering, broken application shortcut:

Last icon shown above is a broken link, which uninstall cannot remove

Last icon shown above is a broken link, which uninstall cannot remove

When the uninstall happens from the previous version, it has no capability to go into each user's profile and remove any links they have manually pinned within the operating system.  That includes the desktop, start menu, the task bar, and quick access area of explorer.  Why not remove those as part of the upgrade?

$profiles = (gwmi win32_userprofile | select LocalPath)
foreach ( $profile in $profiles ) 
{
    $pinnedStartMenu = Join-Path $profile.LocalPath "AppData\Roaming\Microsoft\Internet Explorer\Quick Launch\User Pinned\StartMenu\TRIM.lnk"
    if ( (Test-Path $pinnedStartMenu) -eq $true ) 
    {
        Remove-Item $pinnedStartMenu -Force
        Write-Host "Removed: $($pinnedStartMenu)"
    }
}

Applying Tweaks

Every piece of software has bugs.  During an upgrade it's important to overcome those bugs by implementing any fixes or tweaks required.  For instance, one of the CM builds searched for the existence of dictionary files in an incorrect spot. If left unresolved then no one would be able to use the spellchecker.  By handling that issue in the upgrade script we didn't let the bug impact usage of the product.