Geolocations via Content Manager

Before I go through the trouble of writing more code, I should take a look at what's available.  Hopefully by reviewing each component I can make a list of features missing.  Then I can decide how best to cobble together my final solution.


Accessing Facilities via the Thick Client

When performing a search it is easy to specify that the results include the GPS location in both the view pane and the list pane.  Making the fields visible lets me peruse the data and verify I like the results.  There's no way for me to leverage that data here without a mapping interface.

 
2017-09-24_14-44-29.png

I can use the view pane's GPS Location hyperlink to browse to the location via the map connector.

 
2017-09-24_14-49-37.png

But that's it.  Only potential thing I see here is swapping out the static google map connector for one that embeds an iframe showing results nearby.


Viewing Facilities via Web Client

The out-of-the-box configuration of the Web Client does not support a grid style layout for meta-data in the search results pane.  As you select an individual record in the results, the right-hand view pane exposes a link to the location.  

 
2017-09-24_14-38-28.png

To modify the value you'd either get to the registration form via the update button...

 
2017-09-24_20-00-31.png

Or you click the GPS Location option from the Details drop-down button

 
2017-09-24_15-02-52.png
2017-09-24_15-01-35.png

That's it.  Nothing else to see here! :(


View Facilities via WebDrawer

Webdrawer is a no-thrills interface for the exposure of public records.  Using it implies (at least to me) that you don't care who the user is and you'll just be reading data.  That fits for my scenario, so let's see what's available.

 
2017-09-24_20-06-32.png

Entering "**" into the quick search box and pressing enter should result in all facility boxes being returned (I have nothing else in the dataset).  The search results page shows my boxes, but nothing useful to mapping.  

 
2017-09-24_20-07-44.png

Clicking a facility box yields no mapping fields or data either.  I tried expanding and collapsing all of the regions but no dice.

 
2017-09-24_20-09-32.png

 A quick check of the Webdrawer installation manual and the HPE support site turns up no hits for various relevant keywords. So I visited the ServiceAPI's Property and Field Definition page and see that "RecordGpsLocation" is the property to include in route details.  I add it to both the routes for the search results (WDRecordList) and record details (WDRecordDetails) templates.

 
Note that this is the webdrawer configuration file of a remote server

Note that this is the webdrawer configuration file of a remote server

Modifying the configuration file should result in an automatic reload of the IIS application.  A refresh of my search results page gives me the result shown.

 
2017-09-24_20-27-56.png

A refresh of my record details page does not result in seeing the property.  That's because I added it to the route (which funnels the data in the template), but I did not include it in any of the custom property sets used to group items into the accordion views.  Adding the property to the custom record identification property set should solve the issue.

 
2017-09-24_20-30-00.png

Refreshing the page gave me a quick laugh.  I wish the GPS location was a hyperlink!

 
2017-09-24_20-33-03.png

I'm sure there's a better way to handle this, but I found it easiest to go into the propertyRow partial template and wrap the property value output in a condition.  If the value starts with "https://www.google.com/maps" then replace the output with a valid link.  Otherwise use the normal condition.  Definitely not an ideal solution.

 
2017-09-24_20-43-04.png

Now a reload of the page gives me a usable link.  

 
2017-09-24_20-49-41.png

What's missing?

I have no way, out-of-the-box, to mark search results within the extent of one map.  So re-creating my goal is not possible without more code.  That's ok though.  I've got this! :)

Using Xsd to Dynamically change DataPort during install

This post will lead to code which can manipulate the list of available source format in Content Manager's DataPort.  The code is executed as the last action within an installer project for a new data provider.  It loads an Xml document representing the user's list of sources and then either adds to the list or updates existing entries.  During uninstall it will remove only the newly installed source.

What I needed to accomplish this:

  • Microsoft Visual Studio 2017
  • .Net Framework 4.5.2
  • WiX Toolset v3
  • HPE Content Manager 9.1

The user's list of available DataPort sources is located off the roaming user profile.  Within it exists one node typed "ArrayofDataFormatterDefinition".  That, in turn, contains one or more DataFormatterDefinition children.  

2017-09-24_6-30-50.png

The goals include: add, update, or remove items from this configuration file.


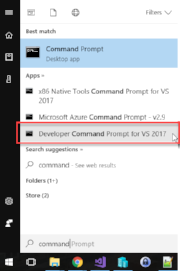
First I launched the Developer Command Prompt for Visual Studio 2017 so that I could mirror someone else's model within my own project.

2017-09-24_4-51-58.png

I navigated into the roaming application data directory for data port preferences.  Executing XSD within that starting directory will make it easier to organize my results.

2017-09-24_4-56-36.png

We can only use XSD on files ending with an ".xml" extension, which the developers have curiously not done.  Since I also don't want to mess up my own copy some how, I might as well go ahead and copy what I've got to a file XSD will accept.  

I did this by executing

copy ImportDataFormatters ImportDataFormatters.xml

Then I execute

xsd ImportDataFormatters.xml

Command Prompt after generating scheme definition

Command Prompt after generating scheme definition

Next I execute

xsd ImportDataFormatters.xsd /c

Command Prompt after generating class definition

Command Prompt after generating class definition

Next I flipped over to Visual Studio and imported the class file.

2017-09-24_5-44-17.png
2017-09-24_6-13-08.png

The file name doesn't match the generated class names.  It doesn't matter either.  What I really want are the properties of the second class defined.  These are the things I want to change for the user. 

2017-09-24_6-15-42.png

In my custom action for this installer I can now serialize and deserialize using the code below.

private static void SaveImportFormattersPreferenceFile(string preferenceFile, XmlSerializer serializer, ArrayOfDataFormatterDefinition importFormatters)
{
    using (TextWriter writer = new StreamWriter(preferenceFile))
    {
        serializer.Serialize(writer, importFormatters);
        writer.Close();
    }
}
 
private static ArrayOfDataFormatterDefinition LoadImportFormattersPreferenceFile(string preferenceFile, XmlSerializer serializer)
{
    ArrayOfDataFormatterDefinition importFormatters;
    using (StreamReader reader = new StreamReader(preferenceFile))
    {
        importFormatters = (ArrayOfDataFormatterDefinition)serializer.Deserialize(reader);
        reader.Close();
    }
 
    return importFormatters;
}

Next I need the logic to find entries in the list or to create a new one.

XmlSerializer serializer = new XmlSerializer(typeof(ArrayOfDataFormatterDefinition));
ArrayOfDataFormatterDefinition importFormatters = LoadImportFormattersPreferenceFile(preferenceFile, serializer);
List<ArrayOfDataFormatterDefinitionDataFormatterDefinition> items = importFormatters.Items.ToList();
var item = importFormatters.Items.FirstOrDefault(x => x.ClassName.Equals("CMRamble.DataPort.Acme"));
if (item == null)
{
    item = new ArrayOfDataFormatterDefinitionDataFormatterDefinition();
    items.Add(item);
}

After I'm done manipulating the item I have in memory, I need to save the changes to disk.

importFormatters.Items = items.ToArray();
SaveImportFormattersPreferenceFile(preferenceFile, serializer, importFormatters);

During my uninstall action I need to basically repeat the process, but this time just remove anything matching my class name.

XmlSerializer serializer = new XmlSerializer(typeof(ArrayOfDataFormatterDefinition));
ArrayOfDataFormatterDefinition importFormatters = LoadImportFormattersPreferenceFile(preferenceFile, serializer);
List<ArrayOfDataFormatterDefinitionDataFormatterDefinition> items = importFormatters.Items.ToList();
importFormatters.Items = items.Where(x => !x.ClassName.Equals("CMRamble.DataPort.Acme")).ToArray();
SaveImportFormattersPreferenceFile(preferenceFile, serializer, importFormatters);

And that's it!  The above code can be attached to any WiX installer action.  

Scheduling a Routine Json Data Import via DataPort

I need to schedule my Json webservice daily import!  

To start I right-clicked on my start button and selected Computer Management.  I then right-clicked on the top node, selected Connect to another Computer, and entered the fully qualified name of my Content Manager workgroup server.  I'm putting the routine onto the server since they typically have the appropriate power saving, backup/recovery, and management settings I need for monitoring.

2017-09-22_15-45-49.png

Once connected I clicked into the system tools, into the task schedule, and then created a new basic task.  I should have first reviewed the existing set of tasks (so as to make sure I didn't already have one defined for this task), but I'll skip that for now.  

2017-09-22_15-45-49.png

First I enter a name (using whatever naming pattern the environment requires, remembering this is on the server and not local) and then provide a reasonable description.  

Task Scheduling Wizard - Name and Description

Task Scheduling Wizard - Name and Description

A setting of daily is sufficient for my frequency...

Task Scheduling Wizard - Trigger Settings

Task Scheduling Wizard - Trigger Settings

I adjusted the time of the day and then clicked next...

2017-09-22_15-45-49.png

Since I couldn't change the action type, I clicked Next right past the "action type" selection wizard page (not shown here).  I then clicked browse and navigated to the TRIMDataPort.exe file located in the Content Manager installation directory.  This works for me because I've got DataPort installed in the exact same location on both my workstation and server.  

Task Scheduling Wizard - Action Program Settings

Task Scheduling Wizard - Action Program Settings

For the of the program I used the following value:

"\\wg1.cmramble.local\dataPort\samhsa\florida facilities.dpproj"

This is a share I created off my workgroup server.  It holds my data port project, the project's Json configuration source, and a logging folder.  Once everything's entered, I clicked Next and double-checked everything on the final wizard step. I need to make sure this executes with the appropriate identity and permissions, so I also checked the box towards the bottom before clicking Finish.

Task Scheduling Wizard - Finish

Task Scheduling Wizard - Finish

This brings up the advanced properties of the task just created by the wizard.  The wizard sets the security options to "Run only when user is logged on", which I will change to "Run whether a user is logged on or not" and I also check "Run with highest privileges".  After clicking OK I have to enter my user name/password again.

Task Properties - Security Options and Credentials

Task Properties - Security Options and Credentials

My Json data source will now be imported every day at 8pm.  Next I need to get my web interface running so I can see these boxes, add the map, and determine how best to scour for electronic records.