Creating an installer for an addin
In a previous post I created my Tesseract OCR client add-in. To test that it worked properly, I registered the client add-in using the debug output path for the assembly location. This allows me to debug the add-in but won't work on any other workstation. Therefore I need to package the add-in into an installer, which would place the required files in a consistent location I can reference when registering the add-in.
To create an installer you'll need the WiX toolset. You can then add a new project to the solution using the Setup Project for WiX v3 project template, as shown below. Note that can you create multiple installers within a given solution (which I'm doing since I have two different add-ins: client and event).

Anytime I add a new project to the solution I revisit the configuration manager. Since I can envision wanting to debug the add-in without any need to create an installer, I decide to create a new solution configuration named "debug (installers)".

Note the active configuration (debug) does not build installers
I leave the existing debug configuration alone and then modify the new one. The debug installer configuration should build all of the projects. Installing that output allows you to attach a debug session to an installed copy of the add-in. The release configuration is identical, except each project configuration is set to release.

The WiX project template results in one file being creating within the project: "Product.wxs". Before tackling that file, I immediately add a reference to the addin project and the WixUIExtension library. The UI extension library will allow me to create a custom UI navigation that prompts the user for the installation path.
I then created a file named UI.wxs and used the content shown below.
<?xml version="1.0" encoding="UTF-8"?>
<Wix xmlns="http://schemas.microsoft.com/wix/2006/wi">
  <Fragment>
    <UI Id="AddinUI">
      <TextStyle Id="WixUI_Font_Normal" FaceName="Tahoma" Size="8" />
      <TextStyle Id="WixUI_Font_Bigger" FaceName="Tahoma" Size="12" />
      <TextStyle Id="WixUI_Font_Title" FaceName="Tahoma" Size="9" Bold="no" />
      <UIRef Id="WixUI_ErrorProgressText" />
      <Property Id="DefaultUIFont" Value="WixUI_Font_Normal" />
      <Property Id="WixUI_Mode" Value="InstallDir" />
      <DialogRef Id="BrowseDlg" />
      <DialogRef Id="DiskCostDlg" />
      <DialogRef Id="ErrorDlg" />
      <DialogRef Id="FatalError" />
      <DialogRef Id="FilesInUse" />
      <DialogRef Id="MsiRMFilesInUse" />
      <DialogRef Id="PrepareDlg" />
      <DialogRef Id="ProgressDlg" />
      <DialogRef Id="ResumeDlg" />
      <DialogRef Id="UserExit" />
      <Publish Dialog="BrowseDlg" Control="OK" Event="DoAction" Value="WixUIValidatePath" Order="3">1</Publish>
      <Publish Dialog="BrowseDlg" Control="OK" Event="SpawnDialog" Value="InvalidDirDlg" Order="4"><![CDATA[WIXUI_INSTALLDIR_VALID<>"1"]]></Publish>
      <Publish Dialog="ExitDialog" Control="Finish" Event="EndDialog" Value="Return" Order="999">1</Publish>
      <Publish Dialog="WelcomeDlg" Control="Next" Event="NewDialog" Value="InstallDirDlg">NOT Installed</Publish>
      <Publish Dialog="InstallDirDlg" Control="Back" Event="NewDialog" Value="WelcomeDlg">1</Publish>
      <Publish Dialog="InstallDirDlg" Control="Next" Event="SetTargetPath" Value="[WIXUI_INSTALLDIR]" Order="1">1</Publish>
      <Publish Dialog="InstallDirDlg" Control="Next" Event="DoAction" Value="WixUIValidatePath" Order="2">NOT WIXUI_DONTVALIDATEPATH</Publish>
      <Publish Dialog="InstallDirDlg" Control="Next" Event="SpawnDialog" Value="InvalidDirDlg" Order="3"><![CDATA[NOT WIXUI_DONTVALIDATEPATH AND WIXUI_INSTALLDIR_VALID<>"1"]]></Publish>
      <Publish Dialog="InstallDirDlg" Control="Next" Event="NewDialog" Value="VerifyReadyDlg" Order="4">WIXUI_DONTVALIDATEPATH OR WIXUI_INSTALLDIR_VALID="1"</Publish>
      <Publish Dialog="InstallDirDlg" Control="ChangeFolder" Property="_BrowseProperty" Value="[WIXUI_INSTALLDIR]" Order="1">1</Publish>
      <Publish Dialog="InstallDirDlg" Control="ChangeFolder" Event="SpawnDialog" Value="BrowseDlg" Order="2">1</Publish>
      <Publish Dialog="VerifyReadyDlg" Control="Back" Event="NewDialog" Value="InstallDirDlg" Order="1">NOT Installed</Publish>
      <Publish Dialog="VerifyReadyDlg" Control="Back" Event="NewDialog" Value="MaintenanceTypeDlg" Order="2">Installed AND NOT PATCH</Publish>
      <Publish Dialog="VerifyReadyDlg" Control="Back" Event="NewDialog" Value="WelcomeDlg" Order="2">Installed AND PATCH</Publish>
      <Publish Dialog="MaintenanceWelcomeDlg" Control="Next" Event="NewDialog" Value="MaintenanceTypeDlg">1</Publish>
      <Publish Dialog="MaintenanceTypeDlg" Control="RepairButton" Event="NewDialog" Value="VerifyReadyDlg">1</Publish>
      <Publish Dialog="MaintenanceTypeDlg" Control="RemoveButton" Event="NewDialog" Value="VerifyReadyDlg">1</Publish>
      <Publish Dialog="MaintenanceTypeDlg" Control="Back" Event="NewDialog" Value="MaintenanceWelcomeDlg">1</Publish>
      <Publish Dialog="CustomizeDlg" Control="Back" Event="NewDialog" Value="CustomizeDlg">1</Publish>
      <Publish Dialog="CustomizeDlg" Control="Next" Event="NewDialog" Value="CustomizeDlg">1</Publish>
      <Publish Dialog="InstallDirDlg" Control="Next" Event="NewDialog" Value="CustomizeDlg">1</Publish>
      <Property Id="ARPNOMODIFY" Value="1" />
    </UI>
    <UIRef Id="WixUI_Common" />
  </Fragment>
</Wix>
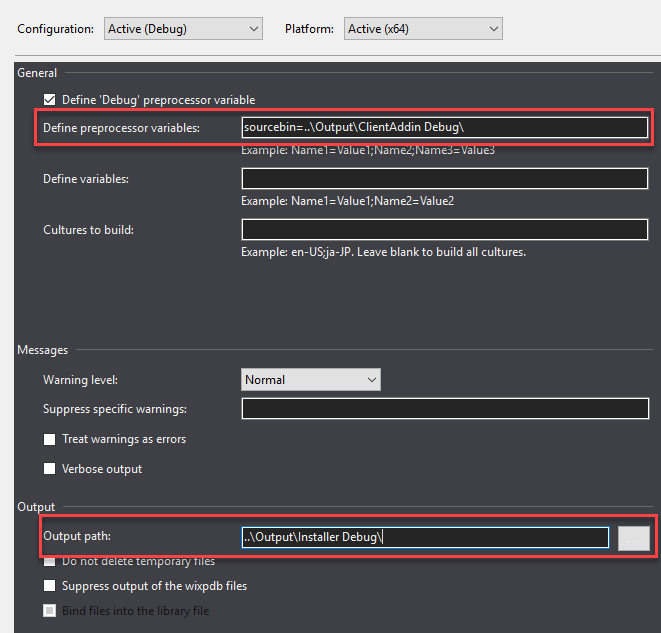
Next I modified the project so that there is a preprocessor variable for the source of files, the output is placed into an alternate location, and heat is used to harvest content. Below you can see those first two changes. This was done for all the project configurations.
In the build events I created a heat command that harvests the files into "Content.wxs"...

The full text of the command:
heat dir "$(SolutionDir)Output\ClientAddin $(ConfigurationName)" -dr INSTALLFOLDER -var var.sourcebin -srd -sreg -gg -cg AddinComponents -out "$(ProjectDir)Content.wxs"
Next I added a new file to the solution named "Content.wxs". This file will be replaced each time the project is built (the heat command above generates the content based on the output from the other project). The variable parameter matches the preprocessor variable name used in the project properties, effectively ensuring any future changes to the add-in will be included in the installer.
The last step is to update the product file. Within it I added all the usual manufacturer, product, and media information. Then I removed everything else (the default fragments provided by the project template). Instead I reference the UI and the add-in components generated by heat command.
<?xml version="1.0" encoding="UTF-8"?>
<Wix xmlns="http://schemas.microsoft.com/wix/2006/wi">
  <Product Id="*" Name="CMRamble Ocr ClientAddin" Language="1033" Version="1.0.0.0" Manufacturer="CMRamble.com" UpgradeCode="05ff6529-a724-4eaf-a199-d920ef03bc20">
    <?define IFOLDER = "INSTALLFOLDER"?>
    <?define InfoURL="https://cmramble.com" ?>
    <Package InstallerVersion="300" Compressed="yes" InstallScope="perUser" />
    <MajorUpgrade DowngradeErrorMessage="A newer version of [ProductName] is already installed." />
    <Media Id="1" Cabinet="ClientAddin.cab" EmbedCab="yes"/>
    <Feature Id="ProductFeature" Title="Installer" Level="1">
      <ComponentGroupRef Id="AddinComponents" />
    </Feature>
    <Property Id="ARPHELPLINK" Value="$(var.InfoURL)" />
    <Property Id="WIXUI_INSTALLDIR" Value="$(var.IFOLDER)"/>
    <UIRef Id="AddinUI" />
  </Product>
  <Fragment>
    <Directory Id="TARGETDIR" Name="SourceDir">
      <Directory Id="ProgramFiles64Folder">
        <Directory Id="CMRambleFolder" Name="CMRamble">
          <Directory Id="OcrFolder" Name="Ocr">
            <Directory Id="INSTALLFOLDER" Name="ClientAddin" />
          </Directory>
        </Directory>
      </Directory>
    </Directory>
  </Fragment>
</Wix>
All done! I repeated the process for the event processor plugin and then hit build. The result is an installer for each.

If I launch the client add-in installer I see the UI I defined in the UI.wsx file. It sequenced the user from the welcome dialog to the installation path dialog. Clicking next should ask the user where to install it.

It behaves as expected! The path you supply here is what you will use when later registering the add-in within the client, so it must be consistent across your organization.

Clicking next shows the ready to install dialog and an install button.

Once installation has completed, a new folder will exist on the workstation. It should contain all of the files harvested from the client add-in project. As the solution grows the installer should automatically keep-up with new references.

Contents of Client Addin installation on workstation
Within the client the add-in is managed by clicking external links on the administration ribbon.

Then click new generic add-in (.Net)...

Provide a name (this can be anything you want) and select the most appropriate path for your environment.

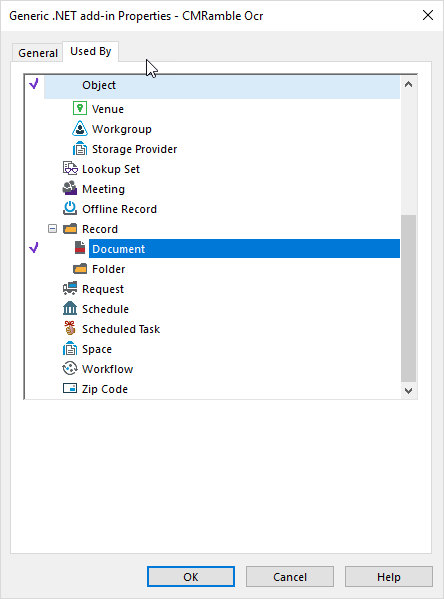
If you can click OK without receiving an error message, then you have a valid configuration (according to this workstation). Once the valid configuration has been saved, you must click properties to enable the add-in on specific objects.

The client add-in is intended for electronic documents so I enabled the document record type.
A quick test of the custom actions proves the installer worked successfully end-to-end.

You can access the latest installers here.