Adding Geolocation to my Json Import

My initial import just mapped the facility ID into the expanded record number property and the name into the title.  I can see from the Json response that there is a "latlng" property I can import.  It has two real numbers separated by a comma.  If I map that to the GPS Location field within Content Manager, I get this error message:

Details: Setting property failed. Item Index: 295, Property Caption: 'GPS Location', Value: 27.769625, -82.767725    Exception message: You have not entered a correct geographic location. Try POINT(-122.15437906 37.443134073) or use the map interface to mark a point.

Funny how DataPort is so demanding with regards to import formats.  Even funnier that it gives you no capability to transform data during "port".  I'll need to add some features into my Json import data formatter: add value prefix, suffix, and a geolocation converter feature to each property.  

I'll use the prefix in record numbers moving forward (everyone does that).  I'll use suffixes possibly in record numbers, but more likely on record titles (inserting a name, facility, region, etc, in title).  I'll use a dodgy static mapping for the geolocation converter (whatever gets my current data into the POINT structure).

2017-10-13_19-49-48.png

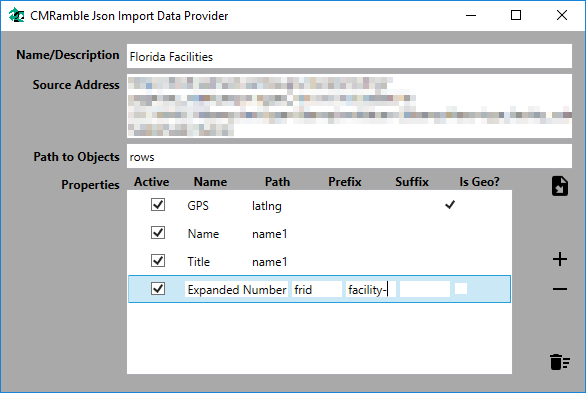
Now when I import from this json source I'll have additional record number protections and an importable geolocation.  Also notice that I'm exposing two properties to Content Manager: name and title.  Both of these point to the "name1" property of the original source.  Since DataPort only allows you to match one column to one source, you cannot re-use an import source property.  In my example I want to push a copy of the original value into a second additional field.  Having this flexibility gives me just what I need.

Getting hyped over HyperV

I vividly remember going to a VMWare in-person training session in the Melbourne CBD about a decade ago.  Ever since then I've been using their products to manage my individual and company environments and infrastructures.  Just about every customer site uses their products as well.  It costs money to maintain and support, which I don't like.  

I recently stepped through an MCSA study guide and there was a whole section devoted to HyperV (Microsoft's alternative to VMWare).  It was entirely new for me.  I'm impressed how easy it is to setup, use, and manage.  Since it's an integral component of Windows itself, making use of it becomes more interesting as each day arrives.  

For me the best feature is that it's included as a feature of Windows 10 and Windows Server.  That means I can create a VM on my desktop and then migrate it to a development, testing, or production environment.  I don't have to pay for a third-party product to do this.  Considering I rebuild my workstation every 3 months, it's becoming a silent blessing.

Combine that with the fact that I get powershell commands along with the management console, I can now script EVERYTHING!  

Maybe a script to create a new workgroup server virtual machine?

$envName = 'CMRamble'           #Environment Name
$serverType = 'Workgroup'       #Server Type
$vmRoot = "D:\HyperV"           #Where to put the VMs
$vmName = "$($envName) $($serverType)"   #Name of this VM as appears in HyperV
$vmPath =  "$($vmRoot)\$($envName)"    #Storage Location of VMs in Root Path
$vhdPath = Join-Path $vmPath "$($vmName)\Virtual Hard Disks\$($serverType).vhdx"    #Storage Location of HD for VM
$vSwitch = "$($envName)"        #Virtual Switch Name
$osPath = "D:\Software\en_windows_server_2016_x64_dvd_9718492.iso"   #Storage Location of Operating System
#Find existing or create new VM
$vm = Get-VM -Name $vmName -ErrorAction SilentlyContinue
if ( $vm -eq $null ) {
    New-VM -Name $vmName -Path $vmPath -MemoryStartupBytes 512MB -SwitchName $vSwitch -Generation 2
}
#Create new virtual hard disk if needed
if ( (Test-Path $vhdPath) -eq $false) {
    New-VHD -Path $vhdPath -SizeBytes 60GB -Dynamic 
}
#Attach vhd
Add-VMHardDiskDrive -VMName $vmName -Path $vhdPath
#Get or create DVD drive
$dvd = Get-VMDvdDrive -VMName $vmName
if ( $dvd -eq $null ) {
    $dvd = Add-VMDvdDrive -VMName $vmName
}
#Set DVD to boot first
Set-VMFirmware -VMName $vmName -FirstBootDevice $dvd
#Point the DVD to the OS
if ( (Test-Path $osPath) -eq $true ) {
    Set-VMDvdDrive -VMName $vmName -Path $osPath -ToControllerNumber 0 -ToControllerLocation 1
}
#Dodgy firmware fix that seemed to fix something
Get-VM $vmName|Get-VMFirmware|ForEach {Set-VMFirmware -BootOrder ($_.Bootorder | ? {$_.BootType -ne 'File'}) $_}

Then more scripts that start it, configure the OS, install Content Manager, and copy the software configuration files to it. After running all these scripts the VM is ready to be added within the Enterprise Studio!  Pretty cool to be able to have a new environment fully ready in just a few minutes.

Moving the VM to another server is super easy.  I right-click on the VM and select Move.  Then specify the name of the destination server and select where on that server it should be placed.  I'm placing this VM on the "D:\" partition, which I happen to know is a massive SSD (makes a big difference with HyperV).  

I didn't stop-watch it, but it seems to have taken 10 minutes or so for this 20 GB VM.  Best part is that my Content Manager Virtual Machine had no down-time.  

 
Moving a VM from one server to another is quite easy

Moving a VM from one server to another is quite easy


You may get the error message below when you attempt to kick off a move.  If you did, you need to initiate the move on the source server directly (and not by connecting the HyperV console to another server).

2017-10-13_10-31-07.png

Adding HyperV to your workstation

First I right-click on the start-menu and select Programs and Features

2017-10-13_10-56-43.png

Then I click the Programs and Features link in the Related settings section of the right-hand pane.

 
2017-10-13_10-57-42.png
 

Then I click Turn Windows features on or off

2017-10-13_10-59-39.png

Then I find and enable both the HyperV features

2017-10-13_10-53-39.png

I let it finish and restart my system

2017-10-13_10-56-15.png


Destroy this without any delay!

If the retention schedule says "Keep no longer than 3 years", establishing an effective process within Content Manager becomes tricky.  We don't want to keep it very long, but we also need to be able to go through management processes for approval.  How do we accomplish that review without tacking another year onto the life-cycle of that record?   

As shown below, trigger properties now have an option for "without any delay".  It also supports a set number of days (previously only years and months).  

2017-10-11_15-39-09.png

This approach is most effective when storing active records within Content Manager.  Once a user creates a record the schedule is attached and the Make Inactive trigger immediately calculates for the 3 year mark.  Later the user, or a power user, can move the record to an inactive container if its' known to no longer be needed (again think of the "no longer than 3 year" retention schedule). 

Otherwise a routine saved search looking for active->inactive trigger changes would surface this record.  We'd send it to the owning unit for review and approval.  They can either move it into an inactive container, change the disposition themselves, or change the schedule.

I find it useful to now have a saved search for these types of schedules:

 
trigger:[delayType:2]

Another saved search for all of the records using a schedule having one of these triggers

 
schedule:[trigger:[delayType:2]]

A saved search to give me all of the records to be destroyed using this approach:

 
schedule:[trigger:[delayType:2]] destroyOn:1/1/1900 - today

A saved search to give me all records to be destroyed next month:

 
schedule:[trigger:[delayType:2]] destroyOn:next month

A saved search to give me all of the records to be made inactive next month using this approach:

 
schedule:[trigger:[delayType:2]] inactiveOn:next month