Checking who's searching for what

Did you know the latest version of Content Manager allows you to store user queries in the workgroup server logs?  Imagine extracting from these logs a treasure-trove of anecdotal meta-data searching tips & tricks or insight into actual product usage.  You can get quick reports of who searched for what and when.

To get this going you need to modify the properties of your workgroup server(s).

2017-10-11_22-35-29.png

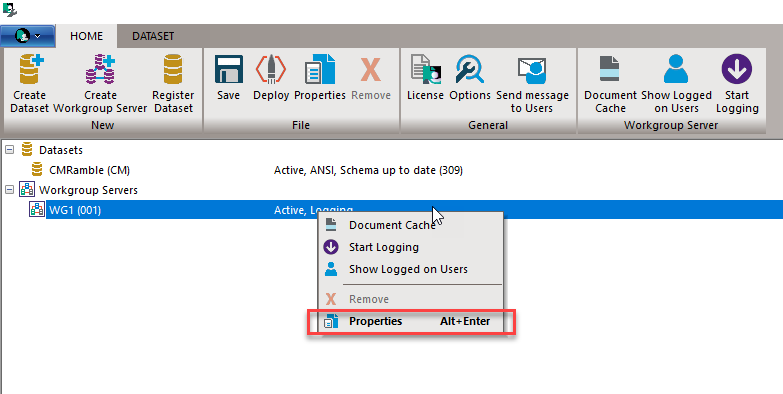
The workgroup server has two properties that we need to enable: 

  1. Enable logging on next deployment
  2. Add user query strings to workgroup server log
2017-10-11_22-34-36.png

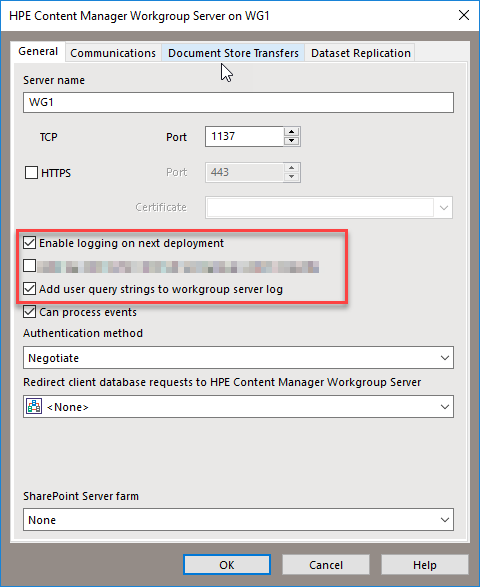
Once you click OK you have to save and deploy.

2017-10-11_22-37-10.png

This forces the server(s) to re-initialize using the new configuration.  I will see log files accumulating on the local server's application data directory.  If I use windows explorer I can navigate to it like shown in the image below.

2017-10-11_22-39-24.png

If I open that file within Notepad++ I can see a lot of information.  I just want to focus in on the search queries though.  The search itself is surrounded by the pipe character (|).  Here's what my log looked like after a few quick searches.

2017-10-11_22-45-25.png

Powershell is such a handy thing!  I created one that manages these logs files and extracts what I need.  I use a dictionary to track users, their queries, and relational details about the queries themselves.  For instance if the user searched by title, notes, or any word, I look-up other trim indexed words.  When the user doesn't use asterisks, I calculate what would have happened if they did.  I can then use this for targeted training one-on-one, or to guide the creation of updated training materials.

2017-10-11_23-01-58.png

Take the first entry where I searched for "cli".  I was able to see that there were four indexed words containing "cli" (clinic, clinics, clinic-, and clinton).  Those 4 words are used a total of 57 times (not necessarily unique records).  Yet I, as the user, received 0 results.  The user would have received results when using wildcards. 

The really nifty part is powershell has a ConvertTo-Json command.  If I output the results to a json file within my webdrawer instance, I can consume all of this new information in other places.  Like maybe within webdrawer, during an audit, or as part of a health check.

Speaking of webdrawer and indexed words..... 

2017-10-11_23-23-55.png

Don't let OLE DB slow you down

Out-of-the-box sounds good to most, but to a trained ear it screams "poor performance".  It could be the root cause of users receiving a "timed out" response when searching, or sluggish response when scrolling through search results.  A quick way to try and resolve this poor performance is to use a native driver.

When creating a dataset within the Content Manager Enterprise Studio we can either pick SQL Server or Oracle as our database platform.  Making a selection tells the solution which flavor of SQL to use, but not which driver to use.  You get to pick that on the connections tab, as shown below. 

Connection tab of my dataset properties

Connection tab of my dataset properties

The very first thing written in that text box is the provider (driver) to be used when connecting to the database.  You can see here I'm using the SQLOLEDB.1 driver.  That's the default.  If I click the blue KwikSelect icon I can see the datalink properties dialog.  

Initial view of connection string properties

Initial view of connection string properties

Clicking onto the Provider tab will show all of the available drivers.  The highlighted one is the currently selected one for the connection string.  So that "SQLOLEDB.1" equals the "Microsoft OLE DB Provider for SQL Server".  That's the generic one that comes with Windows.  It works but won't contain the unique features and refinements of your SQL Server version. 

Since I have the SQL Server Native Client available, I should be picking that!

List of drivers available on the local machine

List of drivers available on the local machine

Picking the native client forces me to click next and then re-enter my database details.  That's because I'll have new options and features available for my connection.  The interface changes slightly (and more options are available off the advanced tab).  I'll just re-enter what I had before and click OK.

2017-10-11_0-43-06.png

Now if I save and deploy all is well.  If I have multiple workgroup servers I have to deploy the native client onto all of them.  I also have to match the native client version to the SQL server instance build (you should not use mixed builds).    Same goes for Oracle environments.

Don't take my word for it though.  Try it in your development environment and see for yourself (use a load test tool to simulate DB activity).

Making email management as painless as possible

In a previous post I showed how a check-in style leads to newly cataloged emails kicking-off a workflow.  The check-in style resulted in a new label in gmail that I tied to a filter.  Items surfaced via the filter got attached to my gmail label, which in-turn created a record that initiated a workflow.  It's a one-time setup that works well for handling my online form submission.

I get other emails though.  Emails related to projects, for instance.  Some projects may last for 2 days, whilst others may last for 2 months. When I'm on the road I don't want to have to stop and setup a new check-in style for a new project.  In fact, I don't really want to have to setup a new check-in style at all.  Why am I adding/removing check-in styles?  Surely there's got to be a better way.

What I want to have happen

What I want to have happen


I want my check-in styles to be managed automatically.  Specifically I want:

  1. A check-in style to exist if there are any incomplete workflows where I'm assigned to an activity and the initiating record is a container.
  2. A check-in style to be removed if the workflow referenced above is completed.


Time to break out visual studio and write some code! 

If you're not a techie you can scroll to the very end to see the results.


First things first, I create a new class library project.  I referenced the .Net SDK and imported the log4net library via the NuGet package manager.  That gives me a solution that looks like this.

2017-10-08_22-52-20.png

I specify that my Addin implements the Trim Event Processor AddIn interface, which requires that I create a method named ProcessEvent.  In that method I test that the event I react to is one of the relevant events from an activity.  If it is, I call the ManageCheckInStyle method I create next.  Otherwise I exit out of my addin.  

namespace CMRamble.EventProcessor.WorkflowCheckInStyles
{
    public class Addin : TrimEventProcessorAddIn
    {
        private static readonly ILog log = LogManager.GetLogger(typeof(Addin));
        public override void ProcessEvent(Database db, TrimEvent evt)
        {
            XmlConfigurator.Configure();
            switch (evt.EventType)
            {
                case Events.ActivityAssigned:
                case Events.ActivityReassigned:
                case Events.ActivityCompleted:
                case Events.ActivityUndone:
                case Events.ActivityCurrent:
                case Events.ActivitySkipped:
                case Events.ActivityNeedsAuthorization:
                    ManageCheckInStyle(db, evt);
                    break;
                default:
                    break;
            }
        }
 
    }
}

Now I create the skeleton of my ManageCheckInStyle method, like shown below.

private void ManageCheckInStyle(Database db, TrimEvent evt)
{
    try
    {
        Activity activity = new Activity(db, evt.ObjectUri);
        if ( activity != null && activity.AssignedTo != null )
        {
            log.Debug($"Activity Uri {evt.ObjectUri}");
            Workflow workflow = activity.Workflow;
            if ( workflow != null && (workflow.Initiator != null && workflow.Initiator.RecordType.UsualBehaviour == RecordBehaviour.Folder) )
            {
                if ( workflow.IsComplete )
                {
                    log.Debug($"Workflow Uri {workflow.Uri} Is Completed");
                }
                else
                {
                    log.Debug($"Workflow Uri {workflow.Uri} not completed");
                }
            }
        }
    }
    catch ( TrimException ex )
    {
        log.Error($"Exception: {ex.Message}", ex);
    }
    finally
    {
    }
}

Then I implemented each of the requirements I laid-out at the top of the post (something is assigned, and workflow is completed).  First I code the logic for when something is assigned to me.

// ensure that there is a check-in style for this container
TrimMainObjectSearch styleSearch = new TrimMainObjectSearch(db, BaseObjectTypes.CheckinStyle)
{
    SearchString = $"owner:{activity.AssignedTo.Uri} container:{workflow.Initiator.Number}"
};
if ( styleSearch.Count == 0 )
{
    log.Debug($"Creating new check-in style");
    CheckinStyle style = new CheckinStyle(workflow.Initiator);
    style.RecordType = new RecordType(db, "Document");
    style.Name = workflow.Initiator.Title;
    style.StyleOwner = activity.AssignedTo;
    style.MoveToDeletedItems = false;
    style.Save();
} else
{
    log.Info("Check-in style already exists");
}

Last,  I create the logic for when the workflow is completed.

// when no other assigned activities for this container 
TrimMainObjectSearch activitySearch = new TrimMainObjectSearch(db, BaseObjectTypes.Activity)
{
    SearchString = $"workflow:[initiator:{workflow.Initiator.Number}] assignee:{activity.AssignedTo.Uri} not done"
};
if (activitySearch.Count == 0 )
{   // there are no other assigned activities
    TrimMainObjectSearch styleSearch = new TrimMainObjectSearch(db, BaseObjectTypes.CheckinStyle)
    {
        SearchString = $"owner:{activity.AssignedTo.Uri} container:{workflow.Initiator.Number}"
    };
    foreach (CheckinStyle style in styleSearch)
    {
        style.Delete();
    }
}

That's it.  I hit compile and I have a valid add-in.  I go and register it in the Enterprise Studio, like shown below.

2017-10-08_23-01-02.png

To test I go find a project folder and attach a workflow (assigning it to myself).  I then flip on over to my email and see the title of that project folder is now a label in my email (or a folder if using Outlook).

2017-10-08_23-15-40.png

If I complete the workflow the check-in style is automatically removed.  Sweet!  Now I can focus on my real work, and not the constant maintenance of my linkage between email & content manager.