Export Mania 2017 - DataPort
Someone asked a vague question over on the forum about exporting electronic documents. Since I haven't done a post about exporting yet, I thought this would be a good topic to cover. The OP wasn't specific about how to go about exporting so we'll cover them all over the coming posts!
Let's define a few requirements:
- There will be a file exported that include's meta-data for the given record(s)
- There will be a folder created to contain the electronic documents for the given record(s)
- The names of the electronic documents shall be the record numbers and not the record titles
Let's see how to accomplish this with DataPort...
Out-of-the-box DataPort
I can use the out-of-the-box Tab Delimited formatter to craft a DataPort project using the settings below.

In the settings section I can specify where the documents are be exported. Then I scroll down to pick my saved search.

Lastly, I pick the fields I want. I must include the "DOS file" to get the electronic attachments. So for now I'll include the title and DOS file.

If I save and execute this project I get a meta-data file like this one...
And a set of electronic documents like these...

The forum post asked how these file names could be in record number format. The existing format is a combination of the dataset ID, the URI, an underscore, and the suggested file name. If this is as far as I go then I cannot meet the requirement.
So purely out-of-the-box is insufficient! :(
Out-of-the-box DataPort with Powershell
I think a quick solution could be to directly rename the files exported. Unfortunately my current export lacks enough meta-data to accomplish the task though. The file name doesn't include the record number. Nor does the meta-data file.
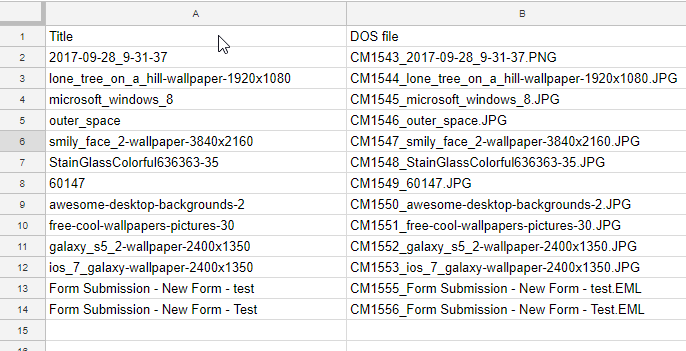
But if I add "Expanded number" as a field, I can then directly manipulate the results.

Now my meta-data file looks like this...

Now that I have the meta-data I need I can write a powershell script to accomplish my tasks. The script doesn't actually need to connect into CM at all (though it's probably best if I looked up the captions for the relevant).
The script does need to do the following though:
- Open the meta-data file
- Iterate each record in the file
- Rename the existing file on disk
- Update the resulting row of meta-data to reflect the new name
- Save the meta-data file back.
A quick and dirty conversion of these requirements into code yields the following:
$metadataFile = "C:\DataPort\Export\Out-of-the-box Electronic Export\records.txt"
$subFolder = "C:\DataPort\Export\Out-of-the-box Electronic Export\Documents\"
$metaData = Get-Content -Path $metadataFile | ConvertFrom-Csv -Delimiter "`t"
for ( $i = 0; $i -le $metaData.Length; $i++ )
{
    $recordNumber = $metaData[$i]."Expanded Number"
    $existingFileName = $metaData[$i]."DOS file"
    $existingFilePath = [System.IO.Path]::Combine($subFolder, $existingFileName)
    $newFileName = ($recordNumber + [System.IO.Path]::GetExtension($existingFileName))
    $newFilePath = [System.IO.Path]::Combine($subFolder, $newFileName)
    if ( ![String]::IsNullOrWhiteSpace($existingFileName) -and (Test-Path $existingFilePath) -and (Test-Path $newFilePath) -eq $false )
    {
        if ( (Test-Path $newFilePath) )
        {
            Remove-Item -Path $newFilePath
        }
        Move-Item -Path $existingFilePath -Destination $newFilePath
        $metaData[$i].'DOS file' = $newFileName
    }
}
$metaData | ConvertTo-Csv -Delimiter "`t" -NoTypeInformation | Out-File -FilePath $metadataFile
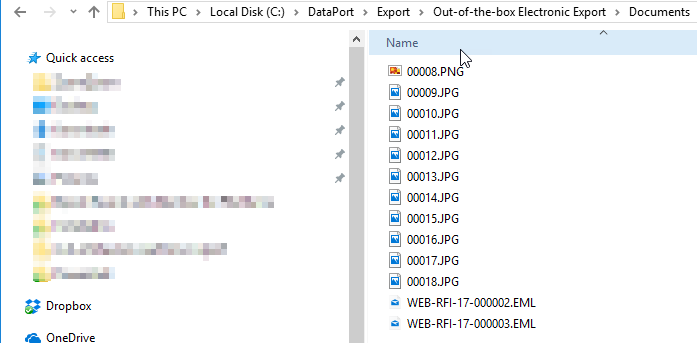
After I run that script on my DataPort results, I get this CSV file...

And my electronic documents are named correctly...
So with a little creative powershell I can achieve the result, but it's a two step process. I must remember to execute this after I execute my export. Granted, I could actually call the export process at the top of the powershell and then not mess with DataPort directly.
This still seems a bit of a hack to get my results. Maybe creating a new DataPort Export Formatter is easy?
Custom DataPort Export Formatter
The out-of-the-box Tab delimited DataPort formatter works well. I don't even need to re-create it! I just need to be creative.
So my first step is to create a new visual studio class library that contains one class based on the IExportDataFormatter interface.
namespace CMRamble.DataPort.Export
{
    public class NumberedFileName : IExportDataFormatter
    {

    }
}
If I use the Quick Action to implement the interface, it gives me all my required members and methods. The code below shows what it gives me...
public string KwikSelectCaption => throw new NotImplementedException();
public OriginType OriginType => throw new NotImplementedException();

public string Browse(Form parentForm, string searchPrefix, Point suggestedBrowseUILocation, Dictionary<AdditionalDataKeys, DescriptiveData> additionalData)
{
    throw new NotImplementedException();
}
public void Dispose()
{
    throw new NotImplementedException();
}
public void EndExport(Dictionary<AdditionalDataKeys, DescriptiveData> additionalData)
{
    throw new NotImplementedException();
}
public void ExportCompleted(ProcessStatistics stats, Dictionary<AdditionalDataKeys, DescriptiveData> additionalData)
{
    throw new NotImplementedException();
}
public void ExportNextItem(List<ExportItem> items, Dictionary<AdditionalDataKeys, DescriptiveData> additionalData)
{
    throw new NotImplementedException();
}
public string GetFormatterInfo(Dictionary<AdditionalDataKeys, DescriptiveData> additionalData)
{
    throw new NotImplementedException();
}
public void StartExport(string exportPath, bool overWriteIfExists, DataPortConfig.SupportedBaseObjectTypes objectType, string TRIMVersionInfo, string[] headerCaptions)
{
    throw new NotImplementedException();
}
public string Validate(Form parentForm, string connectionStringToValidate, Dictionary<AdditionalDataKeys, DescriptiveData> additionalData)
{
    throw new NotImplementedException();
}
Now I don't know how the out-of-the-box tab formatter works, and to be honest I don't care how it does what it does. I just want to leverage it! So I'm going to create a static, readonly variable to hold an instance of the out-of-the-box formatter. Then I force all these members and methods to use the out-of-the-box formatter. It makes my previous code now look like this....
private static readonly ExportDataFormatterTab tab = new ExportDataFormatterTab();
public string KwikSelectCaption => tab.KwikSelectCaption;

public OriginType OriginType => tab.OriginType;

public string Browse(Form parentForm, string searchPrefix, Point suggestedBrowseUILocation, Dictionary<AdditionalDataKeys, DescriptiveData> additionalData)
{
    return tab.Browse(parentForm, searchPrefix, suggestedBrowseUILocation, additionalData);
}

public void Dispose()
{
    tab.Dispose();
}

public void EndExport(Dictionary<AdditionalDataKeys, DescriptiveData> additionalData)
{
    tab.EndExport(additionalData);
}

public void ExportCompleted(ProcessStatistics stats, Dictionary<AdditionalDataKeys, DescriptiveData> additionalData)
{
    tab.ExportCompleted(stats, additionalData);
}

public void ExportNextItem(List<ExportItem> items, Dictionary<AdditionalDataKeys, DescriptiveData> additionalData)
{
    tab.ExportNextItem(items, additionalData);
}

public string GetFormatterInfo(Dictionary<AdditionalDataKeys, DescriptiveData> additionalData)
{
    return tab.GetFormatterInfo(additionalData);
}

public void StartExport(string exportPath, bool overWriteIfExists, DataPortConfig.SupportedBaseObjectTypes objectType, string TRIMVersionInfo, string[] headerCaptions)
{
    tab.StartExport(exportPath, overWriteIfExists, objectType, TRIMVersionInfo, headerCaptions);
}

public string Validate(Form parentForm, string connectionStringToValidate, Dictionary<AdditionalDataKeys, DescriptiveData> additionalData)
{
    return tab.Validate(parentForm, connectionStringToValidate, additionalData);
}
If I compile this and register it within DataPort, I have a new Export DataFormatter that behaves just like the out-of-the-box formatter (trust me, I tested it). Now what I need to do is to add the logic that renames my files and the corresponding meta-data.
First steps first: I need to store some of the information provided in the StartExport method.
private bool correctExportedFileName = false;
private string exportPath;
public void StartExport(string exportPath, bool overWriteIfExists, DataPortConfig.SupportedBaseObjectTypes objectType, string TRIMVersionInfo, string[] headerCaptions)
{
    this.exportPath = $"{Path.GetDirectoryName(exportPath)}\\Documents";
    var captions = headerCaptions.ToList();
    var numberField = captions.FirstOrDefault(x => x.Equals(new EnumItem(AllEnumerations.PropertyIds, (int)PropertyIds.AgendaItemExpandedNumber).Caption));
    var fileField = captions.FirstOrDefault(x => x.Equals(new EnumItem(AllEnumerations.PropertyIds, (int)PropertyIds.RecordFilePath).Caption));
    if ( numberField != null & fileField != null )
    {
        correctExportedFileName = true;
    }
    tab.StartExport(exportPath, overWriteIfExists, objectType, TRIMVersionInfo, headerCaptions);
}
Note that in the code above I've had to do a couple of seemingly dodgy things:
- I had to hard-code the name of the subfolder because it's not avialable to me (so weird I can't access the project details)
- I used the AgendaItemExpandedNumber property Id because that's what maps to the record's expanded number (weird, I know)
All that's left to do is to fix the file and meta-data! I do that in the ExportNextItem method. That method is invoked each time an object has been extracted. So that's when I need to do the rename and meta-data correction.
My method becomes:
public void ExportNextItem(List<ExportItem> items, Dictionary<AdditionalDataKeys, DescriptiveData> additionalData)
{
    if ( correctExportedFileName )
    {
        var numberField = items.FirstOrDefault(x => x.ItemCaption.Equals(new EnumItem(AllEnumerations.PropertyIds, (int)PropertyIds.AgendaItemExpandedNumber).Caption));
        var fileField = items.FirstOrDefault(x => x.ItemCaption.Equals(new EnumItem(AllEnumerations.PropertyIds, (int)PropertyIds.RecordFilePath).Caption));
        if ( numberField != null && fileField != null )
        {
            var originalFileName = Path.Combine(exportPath, fileField.ItemValue);
            if ( File.Exists(originalFileName) )
            {
                var newFileName = $"{numberField.ItemValue}{System.IO.Path.GetExtension(fileField.ItemValue)}";
                var newFilePath = Path.Combine(exportPath, newFileName);
                if (File.Exists(newFilePath) && File.Exists(originalFileName))
                {
                    File.Delete(newFilePath);
                }
                File.Move(originalFileName, newFilePath);
                fileField.ItemValue = newFileName;
            }
        }
    }
    tab.ExportNextItem(items, additionalData);
}
Now if I compile and export, my meta-data file looks exactly the same as the previous method (out-of-the-box with powershell)!
Feel free to try out my DataPort Formatter here.