Security Breaches 101

When I provide training for Content Manager I always start with security.  It doesn't matter if security is a major concern for the organization or not.  The main reason I do this, besides just needing to explain how it works, is to minimize the occurrences of security breaches.  A security breach is a system flag indicating that the objects associated with a record are not in alignment with the security paradigm.  

There are two places that you can define the behavior of security breaches within the software: the security tab of the system options and on the properties of a record type.  If I use the out-of-the-box configuration of Content Manager, the former is set to "Display Warning" and the latter is set to "Ignore".  For the moment I'll focus on the first.

Here's the option I'm talking about:

 
System Options for Movement policy

System Options for Movement policy


If you press F1 you'll see a description for the setting, shown below.

 
When changing Assignee, Home or Owner for a Record to a less secure Location - set the method of Location change when a selected record has a lower security classification than the Location. See also Security breaches.

The options are
•Ignore
•Display Warning - default
•Prevent
 

If I lookup "Security breaches", as it recommends, I get this description:

 
This function enables a HPE Content Manager administrator to view and print occurrences of security breaches that may have occurred.

Security breaches appear in an Historical Events dialog box with all other events that have occurred, for example, Location and container changes and movement history.

By default, the security breaches function will only show security breaches for the current day.

For events to be logged, the relevant event must be selected in the Audit tab of the Record Type.
 

The end result is a pop-up message like this:

2017-10-18_5-34-58.png

Funny!  I have the "Display warning" option selected but it still won't let me save it.  I feel bad for developers at times... having to maintain this complex web of features and then having silly bugs like this.  In a non-buggy build I would be able to click OK and continue on saving the record. For now I'll work around the bug by assigning it to myself and then reassigning it to Elmer.

Once I've done that I can go check out the online audit log.  It will show me all the activity for today, including the right-most column that indicates if a security breach was detected.  The screenshot below shows a series of assignments.  Note the assignments to Elmer are breaches but the one to myself is not.

2017-10-18_5-42-45.png

To resolve this I need to find out what's missing from Elmer's profile.  Now you might think I could use the View Rights feature whilst impersonating Elmer, but you'd be wrong!  As shown below, the UI is indicating the security profile is met by Elmer... but I suspect this is another bug

2017-10-18_5-48-20.png

Instead, I look at the security profile of the record.  I see that it has a security caveat of "HR"...

2017-10-18_5-49-29.png

Now if I look at my location structure I can see the problem...

2017-10-18_22-03-26.png

When I on-boarded Elmer I didn't give him a security profile.  So it makes sense that assigning something to him would breach the security of the record.  Elmer is completely unaware because he can't even access the record.  So this notification is the administrator's opportunity to fix the problem.  To resolve it I need to add the HR caveat to Elmer's profile.

The situation happens anytime you've elected to use a mixture of security levels and caveats.  The best example is a secured facility's mail room, where they may be indexing incoming correspondence and assigning it to the wrong person accidentally.  For that scenario they should be prevented from continuing, because we can't deliver the item as we register it officially.  In other environments it's not the end of the world... it's something to manage.  

If you take a look at this question over on the forum, you'll see a common situation.  Imagine how much time he's going to have to spend fixing this problem!  For a 50 user or less implementation it's a quick task; but for a 5,000 user site, good luck.  He might want to engage a developer within his organization or a knowledgeable consultant.

I thought I'd be creative and write a powershell script to sort this out for him, but no such luck.  It executes fine but doesn't actually save the updated security profile.  Maybe a developer will read this and fix it! :)

Add-Type -Path "D:\Program Files\Hewlett Packard Enterprise\Content Manager\HP.HPTRIM.SDK.dll"
$db = New-Object HP.HPTRIM.SDK.Database
$db.Connect
$breaches = New-Object HP.HPTRIM.SDK.TrimMainObjectSearch -ArgumentList $db, History
$breaches.SearchString = "breach"
foreach ( $breach in $breaches ) 
{
    $location = ([HP.HPTRIM.SDK.History]$breach).MovementLocation
    $unit = $location.Unit
    $recordProfile = ([HP.HPTRIM.SDK.History]$breach).Record.SecurityProfile
    if ( $unit -ne $null -and $unit.SecurityProfile.CanAccess($recordProfile) ) {
        $location.SecurityProfile.UpgradeTo($unit.SecurityProfile)
        $location.Save()
        Write-Host "Updating $($location.FullFormattedName) to security profile of $($unit.FullFormattedName)"
    }
}

Executing this will at least give me a report of all the users that should be updated.  The example below lists Elmer Fudd twice, exactly as shown in the online audit log.  

2017-10-18_21-59-19.png

Export Mania 2017 - Webdrawer

This is the fourth of four posts related to the exportation of records from Content Manager.  Here I'll review a little of the feature functionality within Webdrawer.  You may wish to review the first three posts before continuing below (DataPort, Tag & Task, Record Addin).

The out-of-the-box webdrawer interface provides three opportunities to download an electronic attachment.  Each of these options will direct the user's browser to a URL that delivers the attachment to the browser.  The name of the downloaded file will be the suggested file name property.  

In the screenshot below you can see the download link (appears as 'Document') to the right.  The same link is provided within the viewer, which appears when you select the Preview link. 

Record Detail Page download link

Record Detail Page download link

The downloaded file name in this example ends up being "2017-09-28_9-31-37.png".  

The third option exists as an option in the configuration file.  The default setting is "Metadata", but you can change this to "Document".  You could also change it to preview (which shows you the preview, which then provides a download link).  

2017-10-17_17-35-20.png

If I make this change (to Document) then clicking on a link in the search results page results in the file being downloaded.  

2017-10-17_17-42-29.png

I can't say I find that very useful, but it is what it is.  I'll revert this back to a metadata link and then explore options. 

One quick win is to add the "download" attribute to a link.  This works for Chrome and Firefox for sure, but if you're using Internet Explorer STOP IT.  I modified my resultsList.cshtml file (located in the Views/Shared directory) and added a new column with a new button.

2017-10-17_18-16-20.png

To accomplish this I made three changes.  First I added a new column in the table header row, like shown below.

2017-10-17_18-21-04.png

Next I created a variable that contains my desired file name...

var desiredFileName = record.GetPropertyOrFieldString("RecordNumber") + "." + record.GetPropertyOrFieldString("RecordExtension");

var desiredFileName = record.GetPropertyOrFieldString("RecordNumber") + "." + record.GetPropertyOrFieldString("RecordExtension");

Then I added my column, as shown below...

2017-10-17_18-23-02.png

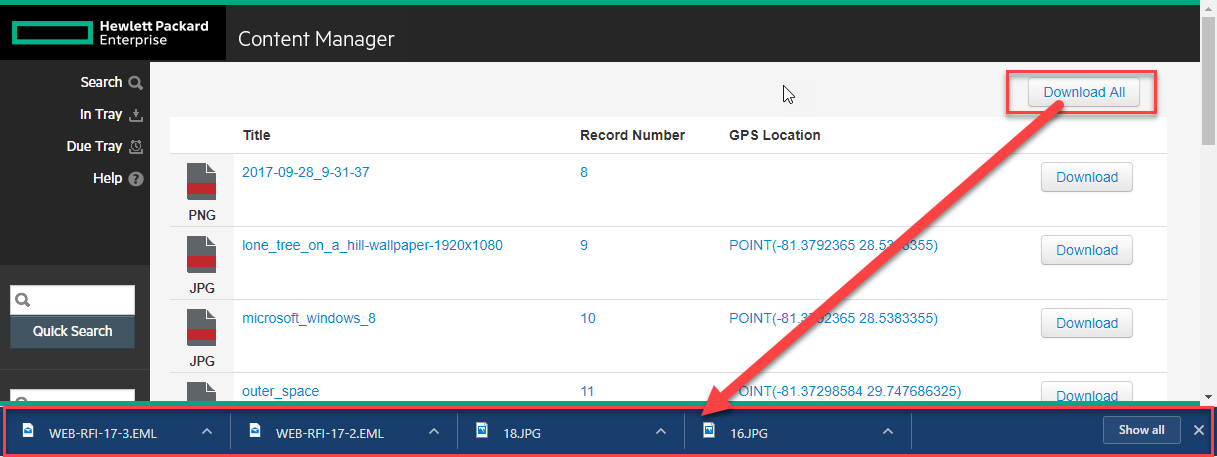
Now these links will download the file using my desired convention!  Next I should go ahead and add a "Download All" link at the top.  That button uses jquery to iterate all of the buttons I added and clicks each one.

Download All clicks all download buttons sequentially

Download All clicks all download buttons sequentially

The javascript for this is below.    

 
function downloadFiles() {
    $('a:not([download=""])').each(function() {
        if ( this.href.indexOf('/Record/') > 0 && this.id.indexOf('.') > 0 ) {
            this.click();
        }
    });
}
 

In order for it to work, you must also add the desiredFileName value into the anchor's ID property.

 
<a id="@desiredFileName" download="@desiredFileName" href="@recordUrl">Download</a>
 

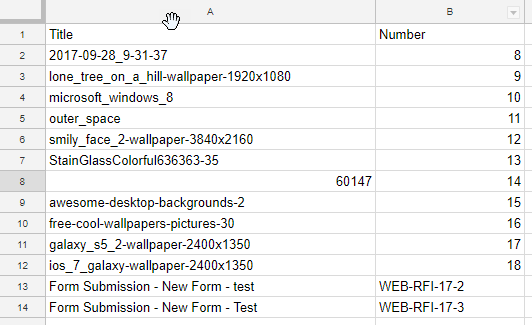
I should also give a meta-data file though too, no?  To accomplish this I add a button at the top and have it call "downloadMetadata".  

2017-10-17_19-01-18.png

The meta-data file includes the title and record number, but it could include anything you want...

2017-10-17_19-00-19.png

To get this to work I first needed to give myself a way to access each row in the results table, as well as a way to access the meta-data values.  I did this by decorating the row with a class and the column values with IDs.  The screenshot below shows these two modifications.

2017-10-17_19-04-24.png

Lastly, I added a new javascript function into the webdrawer.js file.  I've included it below for reference.

function downloadMetadata() {
    var data = [['Title','Number']];
    $('tr.record').each(function() {
        var title = $(this).find('#RecordTitle').text();
        var number = $(this).find('#RecordNumber').text();
        data.push([title, number]);
    });
    var csvContent = "data:text/csv;charset=utf-8,";
    data.forEach(function(infoArray, index){

       dataString = infoArray.join('\t');
       csvContent += index < data.length ? dataString+ "\n" : dataString;

    }); 
    var encodedUri = encodeURI(csvContent);
    var link = document.createElement("a");
    link.setAttribute("href", encodedUri);
    link.setAttribute("download", "meta-data.csv");
    document.body.appendChild(link);
    link.click(); 
}

So much more can be done, like zipping all the results via JSZip.  As mentioned before, I could also include all results of the search, if necessary.  Hopefully this gives the OP some ideas about how to tackle their business requirement.

Export Mania 2017 - Record Addin

This is the third of four posts trying to tackle how to achieve the export of a meta-data file along with electronic documents.  We need/want to have the electronic documents to have the record number in the file names, instead of the standard (read: oddball) naming conventions of the various features.  In this post I'll show how to create a custom record addin that achieves the requirement.

So let's dive right on in!


I created a new C# Class library, imported the CM .Net SDK (HP.HPTRIM.SDK), and created an Export class that will implement the ITrimAddin interface.

2017-10-16_19-03-38.png

Next I'll use the Quick Action feature of Visual Studio to implement the interface.  It generates all of the required members and methods, but with exceptions for each.  I immediately reorganized what was generated and update it so that it does not throw exceptions.

Collapsed appearance of the class

Collapsed appearance of the class

I find it helpful to organize the members and methods into regions reflective of the features & functionality.  For this particular add-in I will ignore the "Save and Delete Events" and "Field Customization" regions.  Currently my private members and public properties regions look like shown below.

#region Private members
private string errorMessage;
#endregion
 
#region Public Properties
public override string ErrorMessage => errorMessage;
#endregion

If I expand my Initialization region I see two methods: Initialise and Setup.  Initialise is invoked the first time the add-in is loaded within the client.  Setup is invoked when a new object is added.  For now I don't truly need to do anything in either, but in the future I would use the initialise method to load any information needed for the user (maybe I'd fetch the last extraction path from the registry, a bunch of configuration data from somewhere in CM, etc).

#region Initialization
public override void Initialise(Database db)
{
}
public override void Setup(TrimMainObject newObject)
{
}
#endregion

Next I need to tackle the external link region.  There are two types of methods in this region: ones that deal with the display of menu links and the others that actually perform an action.  My starting code is shown below.  

#region External Link
public override TrimMenuLink[] GetMenuLinks()
{
    return null;
}
public override bool IsMenuItemEnabled(int cmdId, TrimMainObject forObject)
{
    return false;
}
public override void ExecuteLink(int cmdId, TrimMainObject forObject, ref bool itemWasChanged)
{
 
}
public override void ExecuteLink(int cmdId, TrimMainObjectSearch forTaggedObjects)
{
}
#endregion

First I'll tackle the menu links.  The TrimMenuLink class, shown below, is marked as abstract.  This means I need to create my own concrete class deriving from it. 

2017-10-16_18-20-50.png

Note that the constructor is marked protected.  Thankfully, because of that, I can eventually do some creative things with MenuLink (maybe another blog post someday).  For now I'll just add a class to my project named "ExportRecordMenuLink".  I apply the same process to it once it's generated, giving me the results below.

using HP.HPTRIM.SDK;
 
namespace CMRamble.Addin.Record.Export
{
    public class ExportRecordMenuLink : TrimMenuLink
    {
        public override int MenuID => 8001;
 
        public override string Name => "Export Record";
 
        public override string Description => "Exports records to disk using Record Number as file name";
 
        public override bool SupportsTagged => true;
    }
}

Now that I've got a Menu Link for my add-in, I go back and to my main class and make a few adjustments.  First I might as well create a private member to store an array of menu links.  Then I go into the intialise method and assign it a new array (one that contains my new addin).   Last, I have the GetMenuLinks method return that array.  

private TrimMenuLink[] links;
 
public override void Initialise(Database db)
{
    links = new TrimMenuLink[1] { new ExportRecordMenuLink() };
}
public override TrimMenuLink[] GetMenuLinks()
{
    return links;
}

The IsMenuItemEnabled method will be invoked each time a record is "selected" within the client.  For my scenario I want to evaluate if the object is a record and if it has an electronic document attached.  Though I also need to ensure the command ID matches the one I've created in the ExportRecordMenuLink.

public override bool IsMenuItemEnabled(int cmdId, TrimMainObject forObject)
{
    return (links[0].MenuID == cmdId && forObject.TrimType == BaseObjectTypes.Record && ((HP.HPTRIM.SDK.Record)forObject).IsElectronic);
}

Almost done!  There are two methods left to implement, both of which are named "ExecuteLink".  The first deals with the invocation of the add-in on one object.  The second deals with the invocation of the add-in with a collection of objects.  I'm not going to waste time doing fancy class design and appropriate refactoring.... so pardon my code.  

public override void ExecuteLink(int cmdId, TrimMainObject forObject, ref bool itemWasChanged)
{
    HP.HPTRIM.SDK.Record record = forObject as HP.HPTRIM.SDK.Record;
    if ( (HP.HPTRIM.SDK.Record)record != null && links[0].MenuID == cmdId )
    {
        FolderBrowserDialog directorySelector = new FolderBrowserDialog() { Description = "Select a directory to place the electronic documents", ShowNewFolderButton = true };
        if (directorySelector.ShowDialog() == DialogResult.OK)
        {
            string outputPath = Path.Combine(directorySelector.SelectedPath, $"{record.Number}.{record.Extension}");
            record.GetDocument(outputPath, falsestring.Empty, string.Empty);
        }
    }
}

In the code above I prompt the user for the destination directory (where the files should be placed).  Then I formulate the output path and extract the document.  I should be removing any invalid characters from the record number (slashes are acceptable in the number but not on the disk), but again you can do that in your own implementation.

I repeat the process for the next method and end up with the code shown below.

public override void ExecuteLink(int cmdId, TrimMainObjectSearch forTaggedObjects)
{
    if ( links[0].MenuID == cmdId )
    {
        FolderBrowserDialog directorySelector = new FolderBrowserDialog() { Description = "Select a directory to place the electronic documents", ShowNewFolderButton = true };
        if (directorySelector.ShowDialog() == DialogResult.OK)
        {
            foreach (var taggedObject in forTaggedObjects)
            {
                HP.HPTRIM.SDK.Record record = taggedObject as HP.HPTRIM.SDK.Record;
                if ((HP.HPTRIM.SDK.Record)record != null)
                {
                    string outputPath = Path.Combine(directorySelector.SelectedPath, $"{record.Number}.{record.Extension}");
                    record.GetDocument(outputPath, falsestring.Empty, string.Empty);
                }
            }
        }
    }
}

All done!  Now, again, I left out the meta-data file & user interface for now.  If anyone is interest then add a comment and I'll create another post.  For now I'll compile this and add it to my instance of Content Manager.  

2017-10-16_18-52-41.png

Here's what it looks like so far for the end-user.

2017-10-16_18-53-56.png

A wise admin would encourage users to place this on a ribbon custom group, like shown below.

2017-10-16_18-56-04.png

When I execute the add-in on one record I get prompted for where to place it...

2017-10-16_18-57-08.png

Success!  It gave me my electronic document with the correct file name.

2017-10-16_18-58-41.png

Now if I try it after tagging all the records, the exact same pop-up appears and all my documents are extracted properly.

2017-10-16_19-00-20.png

Hopefully with this post I've shown how easy it is to create custom add-ins.  These add-ins don't necessarily need to be deployed to everyone, but often times that is the case.  That's the main reason people shy away from them.  But deploying these is no where near as complicated as most make it seem.

You can download the full source here.