Audio, Renditions, and Searchable PDF's
I ran the import and noticed a few errors. There were 17 records in the collection with two file names in the "File Name" field. I could not find an explanation for this on the NARA website. Though the meta-data makes it clear that the record is a magnetic tape.

The 17 records with one Audio and one Transcript
Up to this point I had stored just the PDF's within Content Manager no different than if I had dragged-and-dropped them into CM. Now I have an audio file and supporting transcript. I noticed a problem with these transcripts, which helped me realize I have a problem with all of them. They haven't been OCR'd and I therefore cannot perform an effective analysis of the contents.

Annotations go into IDOL... the rest is useless to IDOL
In the image above I can see the word "release" in the annotation and the word "London" in the image. If I run document content searches for these two words, users might expect to see at least one result for each word.

936 records have "released" in content

No records found with "London" in content
I did perform a full reindex of IDOL after I imported my records. The counts looked good and I received no errors. The size of the index is much smaller than I expected though. Below you can see the total size of the archive is ~9GB. You generally hear people say IDOL should be 10%-20% the size of the document store. Mine is about 2%.

Document store size

IDOL Size -- smaller than expected
Luckily I have Adobe Acrobe Pro and can create a new action to enhance the existing PDF images, OCR the content, save a plain text copy, and save a searchable PDF. As shown below, doing this one time often makes more sense then implementing something more complicated within Content Manager.

On the disk I can see there are now two new files for each PDF....
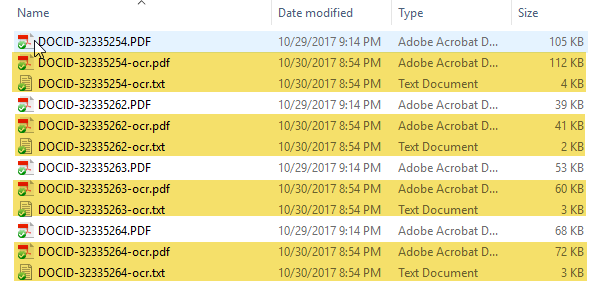
There is a new OCR PDF and OCR TXT file for each PDF
I can fix my records in Content Manager with a powershell script. Here I want to iterate each of the records in the NARA provided TSV file and attach the files according to my own logic. If it's an audio recording then that gets saved as an original rendition, with the original PDF saved as a transcript (Rendition Type Other1). Then the OCR'd PDF becomes the document for each record and the OCR txt file gets attached as an OCR rendition.
Write-Progress -Activity "Attaching Documents" -Status "Loading Metadata" -PercentComplete 0
$metaData = Get-Content -Path $metadataFile | ConvertFrom-Csv -Delimiter "`t"
$x = 0
foreach ( $meta in $metaData )
{
    Write-Progress -Activity "Attaching Documents" -Status "$($meta.'Record Num')" -PercentComplete (($x/$metaData.Length)*100)
    $record = New-Object HP.HPTRIM.SDK.Record -ArgumentList $db, $meta.'Record Num'
    $original = $meta.'File Name'
    try {
        if ( $original.Contains(';') )
        {
            #store WAV as original
            $record.ChildRenditions.NewRendition("$($docFolder)\$($original.Split(';')[1])", [HP.HPTRIM.SDK.RenditionType]::Original, "Audio Recording") | Out-Null
            #store the PDF as an transcript (re-captioned Other1)
            $pdfFileName = $($original.Split(';')[0])
            $record.ChildRenditions.NewRendition("$($docFolder)\$pdfFileName", [HP.HPTRIM.SDK.RenditionType]::Other1, "Transcription") | Out-Null
            #store the OCR'd PDF as main object
            $pdfOcrFileName = $([System.IO.Path]::GetFileNameWithoutExtension($pdfFileName)+"-ocr.pdf")
            $record.SetDocument("$($docFolder)\$pdfOcrFileName)", $false, $false, "")
            #store OCR TXT as rendition
            $ocrTxt = $([System.IO.Path]::GetFileNameWithoutExtension($pdfFileName)+"-ocr.txt")
            $record.ChildRenditions.NewRendition($ocrTxt, [HP.HPTRIM.SDK.RenditionType]::Ocr, "Adobe Acrobat") | Out-Null
        } else {
            #store OCR'd PDF as main object
            $pdfOcrFileName = $([System.IO.Path]::GetFileNameWithoutExtension($original)+"-ocr.pdf")
            $record.SetDocument("$($docFolder)\$($pdfOcrFileName)", $false, $false, "")
            #store file as original
            $record.ChildRenditions.NewRendition("$($docFolder)\$($original)", [HP.HPTRIM.SDK.RenditionType]::Original, "Official Record") | Out-Null
            #stick OCR TXT as rendition
            $ocrTxtFileName = $([System.IO.Path]::GetFileNameWithoutExtension($original)+"-ocr.txt")
            $record.ChildRenditions.NewRendition("$($docFolder)\$($ocrTxtFileName)", [HP.HPTRIM.SDK.RenditionType]::Ocr, "Adobe Acrobat" )| Out-Null
        }
        $record.Save()
    } catch {
        Write-Error $_
    }
    $x++
}
Technically I don't need to store the OCR txt file as a rendition, but IDOL does not give me the ability to "extract" the words it has found within the documents. I need these words available to me for my document analysis and search requirements.
IDOL will also need some time to finish its' own indexing of all these changes. I know exactly how much space was used by both the document store and IDOL before I made these changes. It will be interesting to see how much each grows.