Renumbering Classification/Category Items

Another question over on the forum!  You can't easily renumber classifications via the thick client.  And you can't accomplish this particular change via DataPort (because it uses the level number as the unique Id), so time to break out powershell!

Add-Type -Path "D:\Program Files\Hewlett Packard Enterprise\Content Manager\HP.HPTRIM.SDK.dll"
 
$db = New-Object HP.HPTRIM.SDK.Database
$db.Connect
$classifications = New-Object HP.HPTRIM.SDK.TrimMainObjectSearch -ArgumentList $db, Classification
$classifications.SearchSTring = "top"
foreach ( $obj in $classifications ) {
    $classification = [HP.HPTRIM.SDK.Classification]$obj
    $newId = ([System.Int32]::Parse($classification.IdNumber)-1).ToString("000")
    $classification.SetProperty([HP.HPTRIM.SDK.PropertyIds]::ClassificationLevelNumberUncompressed, $newId)
    $classification.Save
}

In the script above, I find all top-level classifications and renumber everything down one number.  It works because I know my top-level numbering pattern. Here is my top-level pattern.

2017-10-05_17-34-14.png

You can see on line 9 of my code that I am reducing the existing level number by one and then formatting that change to have leading zeros (for a maximum length needed by my pattern).  You'd need to work out the appropriate method for determining the uncompressed number, otherwise it's pretty straight forward.

This should give the OP some ideas as to how to accomplish his goal.

Making the EmailLink Admin Console Easier to Use

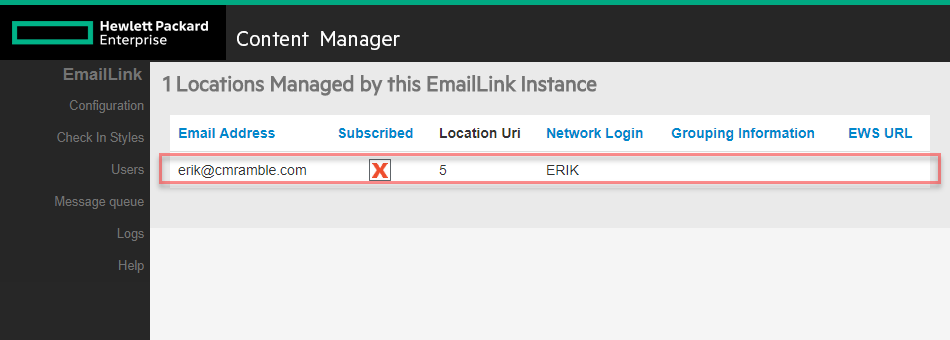
As I manage my EmailLink instance, I can see a list of users being managed.  That's all well and good, but I really want to see this location within Content Manager.  This should be a link!  Same thing for all the other features.  I wish I could navigate directly to the objects.

No link to the location!

No link to the location!

By changing one line of code I can fix this up....

First I launched Notepad++ and then opened the "EmailLink\pages\users.cshtml" file.  I located the line where it outputs the table and wrapped the column within an anchor tag.

2017-10-03_14-15-29.png

I found this code on line 43:

 
<td>@userProfile.PrimarySmtpAddress</td>

I changed it to this:

 
<td><a target="_new" href="http://wg1/HPEContentManager?uri=@userProfile.Uri&t=location&lang=ln_englishus&mbd=true">@userProfile.PrimarySmtpAddress</a></td>

Then I saved the file and reloaded my EmailLInk admin console.  The column turned into a link that, when clicked, launched a new window directly to the location.

2017-10-03_14-20-31.png

So then I repeated the process for the requisite CheckIn Style template file, so that I get the exact same behavior when looking at the check-in styles themselves.

2017-10-03_14-24-45.png

Wouldn't it be cool if I could click "Duplicate for New User" as an administrator?  :)

2017-10-03_14-29-20.png

Kicking off a workflow from an online form submission

I should be drinking the kool-aid, right?  Meaning, I should be using the features of the product suite to my advantage.  I started to go down the route of trying to figure out how to effectively track when someone "Requests More Information" from my website.  I surely don't want to use 4 different products to manage that process.  Why can't I take the form submission from squarespace and have it kick-off a workflow within Content Manager?  

Once my email link server was configured it took all of about 5 minutes to get this setup.


Here's the workflow I want to kick-off....

 
2017-10-03_13-07-35.png
 

First I went into squarespace and created a submission form.  It sends me an email with the contents of the form.  That email looks like the image below.

2017-10-03_11-56-48.png

Next I went into Content Manager and created myself a new check-in style.  I'm doing this via the webclient, but the process is the same for the thick client.  

 
Web-client

Web-client


I then gave the check-in style a name and chose my "Request for Information" record type.  

 
2017-10-03_12-03-20.png


Then I gave it a default workflow template for my process

 
2017-10-03_12-05-04.png


I then clicked into the processing section and checked the first two check boxes: Automatically create server-side email capture folders and Keep email in the mail system.  By keeping it in there I'm hoping my conversations can be automatically related and captured down the road.

2017-10-03_12-56-40.png

Now after I click save, it shows me my new check-in style

 
2017-10-03_12-07-16.png
 

If I go back to my gmail inbox I can now see this folder available

 
2017-10-03_12-08-57.png
 

Next I create a new filter for my inbox, so that all incoming form submissions are automatically labeled into this folder.

 
2017-10-03_11-34-12.png
 

I know the sender and receiver of the messages I care about, so I define those on the filter like shown below.

 
2017-10-03_12-11-58.png
 

In the other options dialog I indicate the new label name and then click save

 
2017-10-03_11-37-03.png
 

Now I go visit my website and complete the form...

2017-10-03_12-28-15.png

Now if I check my workflows worklist, I can see my workflow has been kicked-off & assigned automatically!

 
2017-10-03_13-09-39.png
 

The things we can accomplish with the newest versions are pretty cool.  I can see lots of useful ways to leverage these features.  Keep in mind that once the form data is within Content Manager, I can apply scripts, code, and add-ons to do anything necessary (like harvest the form data, initiate an integration, etc).

The integration with gmail is secure.  It works.  And it's free (if you have both G Suite and Content Manager).  You just need to configure it.  :)